Welcome to our guide on installing Bash on Windows 10. We’ll show you how to enable Developer Mode, install a Linux distro, and access the Bash shell. This allows you to run Linux commands right on your Windows 10 PC. It’s perfect for developers or Linux fans who want to mix both worlds.
So let’s dive into setting up Bash for Windows 10!
Enabling Developer Mode on Windows 10
Turning on Developer Mode on Windows 10 lets you use advanced features like the Windows Subsystem for Linux (WSL). With a few easy steps, your Windows 10 device can smoothly run Linux apps. Here’s the way to switch on Developer Mode:
-
Open Settings
Start by right-clicking the Start menu and choosing “Settings” from the menu. Or, press the Windows key + I for a quick start of the Settings app.
-
Navigate to Update & Security
Once in the Settings app, click “Update & Security” to get to the Windows Update settings.
-
Open Developer Options
In the left menu, find and click “For developers”. This opens the page for Developer options, where you can change your device’s developer settings.
Related Posts:
-
Choose Developer Mode
On the Developer options page, pick the “Developer mode” radio button. This lets you use developer features on your Windows 10, including the Windows Subsystem for Linux.
-
Restart Your Computer
It’s important to restart your computer after enabling Developer Mode. This makes sure the new developer settings are applied. It gets your device ready for using the Windows Subsystem for Linux.


With Developer Mode activated on your Windows 10 device, you’re set to install and use the Windows Subsystem for Linux. Developer Mode opens up new possibilities for powerful development tools and environments on Windows 10.
Installing and Setting Up Bash on Windows 10
Installing Bash on Windows 10 lets you use Linux on your Windows system. It’s an easy process, needing just a few steps.
Step 1: Access the Microsoft Store
First, find the Microsoft Store on your Windows 10 device. Just type “Microsoft Store” in the search bar. Then choose the app from the search results.
Step 2: Select a Linux Distribution
In the Microsoft Store, you need to pick a Linux version to install. We’ll choose Ubuntu Linux for this guide.
Step 3: Install the Distribution
Click on Ubuntu Linux and then “Install.” The Microsoft Store will take care of the download and setup for you. You just need to wait.
Step 4: Launch and Configure
After installing, open the Linux distribution from the Start menu or search for it. You’ll need to make a username and adjust basic settings at the start. Just follow the directions on-screen to get your account ready.
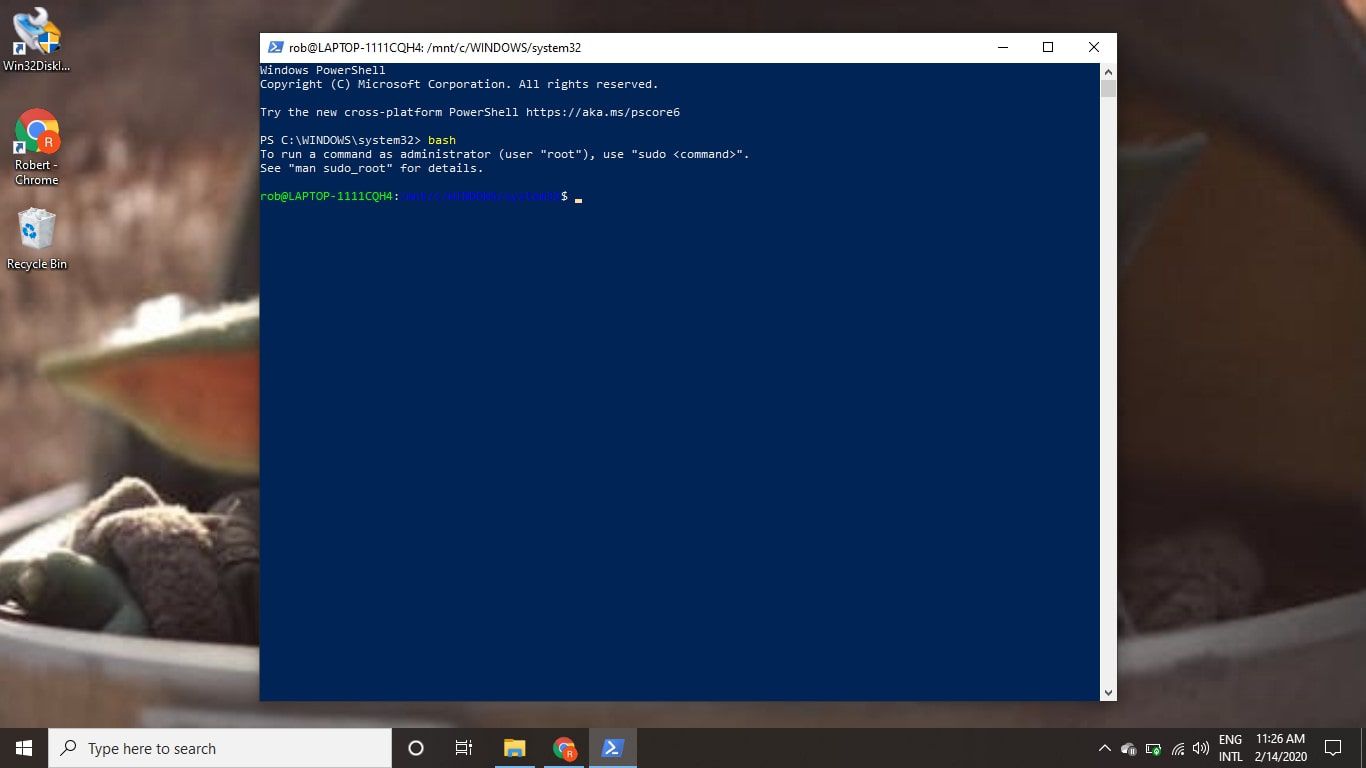
Step 5: Accessing the Bash Shell
After setting up your username and settings, close the Linux window. To get to the Bash shell, right-click the Start menu and choose Windows PowerShell (Admin). Type “bash” in PowerShell and press Enter.
You’re all set to use the Bash shell on Windows 10. Enjoy using Linux commands and the Linux environment without needing another computer.
Requirements for Running Bash on Windows 10
To enjoy the ease of using Bash on Windows 10, some requirements must be met. They make sure your system works well with Bash.
64-bit Version of Windows 10
You need a 64-bit version of Windows to run Bash. This version offers better performance, ensuring a smooth Bash experience.
Windows Version 14393 or Higher
Your Windows 10 should be version 14393 or above. This version has updates that let Bash work well with your system. To find your version, do these steps:
- Click the Start menu and choose the Settings icon.
- Click “System” in the Settings menu.
- Click on “About” on the left side.
- Look for your Windows version under “Windows specifications”. It must be 14393 or more.
If your version is below 14393, update your system to a newer version.
Running Bash on Windows 10 – A System Check
Before setting up Bash on Windows 10, do a quick system check. This ensures your system meets the needed requirements. Just follow these steps:
- Open your Start menu.
- Search for “System Information” and open it.
- In the System Information, find “System Type”. It must say “x64-based PC”.
- Look for “OS Name” and “Version”. Your “Version” should be 14393 or higher. If so, your system is ready for Bash on Windows 10.
If your system passes the check, you can install and set up Bash on Windows 10. If not, you might need to upgrade your system or switch to a 64-bit Windows 10.
Differences Between WSL 1 and WSL 2
There are two versions of Windows Subsystem for Linux (WSL): WSL 1 and WSL 2. Each version offers a unique way of running Linux on Windows. Let’s take a look at what sets them apart.
WSL 1: Compatibility Layer
WSL 1 works by translating Linux system calls into Windows system calls. This lets you run Linux software on Windows smoothly. It offers Linux command line access, making it easy for Linux enthusiasts.
WSL 2: Full Linux Kernel in a Virtual Machine
WSL 2, however, uses a full Linux kernel inside a virtual machine. This setup boosts performance and supports Linux-specific apps better. WSL 2 achieves quicker Linux system calls and better application compatibility.
It also offers a more fluid Linux experience on Windows. Thanks to its virtual machine approach, WSL 2 combines enhanced performance with compatibility. You get the best of Linux without the extra bulk of a typical VM.
Microsoft offers both WSL 1 for those prioritising compatibility and WSL 2 for higher performance needs. The choice between a simple compatibility layer and a full Linux kernel in a VM gives flexibility. The Windows Subsystem for Linux seamlessly blends the Linux environment with Windows.
Installing Ubuntu Font for a True Ubuntu Experience
If you’re keen on having a real Ubuntu feel on Windows 10, consider installing the Ubuntu font. This font captures the spirit and style of the Ubuntu OS. It’s perfect for those who aim for a unified and attractive appearance on their system.
To install the Ubuntu font, just follow these easy steps:
- Start by downloading the Ubuntu Font Family from the official Ubuntu website. They offer the font in various formats.
- Find the “UbuntuMono-R.ttf” file after downloading. This file is the Ubuntu monospace font.
- Next, double-click on the “UbuntuMono-R.ttf” file to launch the font installer.
- In the installer, press “Install” to add the Ubuntu monospace font to your system.
- Wait until the font installs. Then, you’re all set to use the Ubuntu font.
Used mainly in the terminal, the Ubuntu font gives a true Ubuntu experience. It makes your command-line interface look consistent and familiar. Installing this font beautifies your Ubuntu-themed desktop, providing a smooth visual flow.
Key Points:
– For a genuine Ubuntu experience on Windows 10, install the Ubuntu font.
– Get the Ubuntu Font Family from the Ubuntu site.
– Find and install the “UbuntuMono-R.ttf” file.
– This font is great for a unified terminal appearance.
Conclusion
Setting up Bash on Windows 10 lets you use Linux commands smoothly. By turning on Developer Mode and adding a Linux distribution from the Microsoft Store, you boost your experience on Windows 10. When you start the Bash shell, you can run Linux apps and use familiar tools. This opens many doors for both developers and users.
The Windows Subsystem for Linux (WSL) makes installation easy and ensures good compatibility. This means you get the perks of Windows 10 and Linux on the same computer. It’s great for developers on cross-platform projects or Linux fans who want Windows power too.
Why pick one when you can use both? Start Bash on Windows 10 now. You’ll improve your productivity by using the best features from both worlds.
FAQ
How do I enable Developer Mode on Windows 10?
Enabling Developer Mode on Windows 10 is simple. Firstly, right-click the Start menu and choose Settings. Then, navigate to Update & Security and select For developers. Here, pick Developer mode and also enable Windows Subsystem for Linux. Lastly, restart your PC to ensure the changes take effect.
How do I install and set up Bash on Windows 10?
Firstly, visit the Microsoft Store. Choose your preferred Linux distribution, such as Ubuntu, and install it. After installing, open it to set up a username and adjust basic settings.
Once installation is complete, close the window. Next, open Windows PowerShell (Admin) and type “bash”. Now, you can access the Bash shell on Windows 10.
What are the requirements for running Bash on Windows 10?
To run Bash, your system must have a 64-bit version of Windows 10. The version should be at least 14393. Also, ensure your Windows 10 is updated to the latest version.
What are the differences between WSL 1 and WSL 2?
WSL has two versions. WSL 1 acts as a compatibility layer, translating Linux system calls into Windows system calls. This version allows running Linux executable files on Windows.
WSL 2, however, uses a real Linux kernel inside a virtual machine. It offers improved performance and better app compatibility compared to WSL 1.
How do I install the Ubuntu Font for a true Ubuntu experience on Windows 10?
For an authentic Ubuntu feel on Windows 10, install the Ubuntu font. Go to the Ubuntu website and download the Ubuntu Font Family. Find the “UbuntuMono-R.ttf” file and double-click it to install. This font is mainly used in the terminal, providing a consistent Ubuntu look.