Telnet is a key tool for remote computer access. It’s great for fixing network problems. Sadly, Windows 10 doesn’t have Telnet set up from the start. We’ll show you how to get Telnet working on your Windows 10. This will let you use its many features.
Turning Telnet on in Windows 10 is easy. You just need to use the Control Panel. Our easy steps will help you turn on the Telnet Client quickly. Then, you can remotely manage and fix network devices with it.
This skill is handy for IT professionals and tech fans alike. Let’s now learn how to turn Telnet on in Windows 10. It opens up many new opportunities for managing technology.
What is Telnet and How to Enable Telnet on Windows 10?
Telnet is a protocol for remote access to computers. It helps in troubleshooting, remote management, and making software. By turning on Telnet in Windows 10, you can control other computers from afar.
To turn on Telnet in Windows 10, just do these steps:
- Open the Control Panel
- Select Programs and Features
- Click on the option to turn Windows features on or off
- In the Windows Features window, find and tick the Telnet Client box
- Click OK to keep these changes
After saving the changes, Telnet will work on the Windows 10 computer. You can use Telnet for many things like fixing network problems or managing devices remotely.
Enabling Telnet on Windows 10 through Control Panel
To switch on Telnet in Windows 10 using the Control Panel, just follow these instructions:
| Step | Description |
|---|---|
| 1 | Open the Control Panel |
| 2 | Select “Programs and Features” |
| 3 | Click on “Turn Windows features on or off” |
| 4 | Scroll down and tick the “Telnet Client” box |
| 5 | Click OK to save your changes |
By following these instructions, Telnet will be turned on in Windows 10.
Understanding Telnet Security
Telnet is a protocol that lets computers talk to each other over the internet. But, it’s not safe because the data it sends isn’t hidden. This makes Telnet open to attacks, putting private information at risk.
One big worry is that others can listen in and see the data. Also, there’s a risk that hackers can get in the middle. They can see and change the data. This could let them get into systems without permission.
Passwords are another weak spot with Telnet. They are sent as simple text. This means hackers can easily grab them. So, it’s vital to use strong passwords to help keep your accounts safe.
To keep remote access safe, it’s better to use something called Secure Shell (SSH). SSH hides the data it sends. This helps keep private information away from hackers.
“Telnet’s lack of encryption leaves data vulnerable to interception and manipulation, making it crucial to take precautions to protect sensitive information.”
Benefits of a Secure Alternative like SSH
- Securely encrypts data transmission, ensuring the confidentiality of sensitive information.
- Protects against eavesdropping, man-in-the-middle attacks, and data tampering.
- Enhances overall network security by providing a secure remote access solution.
- Offers features like public key authentication and port forwarding for added security and flexibility.
Knowing the risks with Telnet and switching to SSH can cut down on security threats. This helps keep important information safe when you’re accessing systems remotely or doing admin tasks.
How Does Telnet Work?
Telnet is a protocol for text-based chats between a local computer and a distant one. It lets users manage and fix the distant system from afar. To link up, the user on the local side needs to enter the remote’s IP or domain name. After hooking up, the local can send commands to the remote. The remote then responds in real-time.
Telnet sends data in simple text, which is easy to read. Yet, this also makes it weak against hacks like spying and data changes. So, it’s wise to use safer options like Secure Shell (SSH) for keeping data safe.
“Telnet works by establishing a connection between a local computer and a remote system, allowing for text-based communication.”
Telnet is great for handling systems far away, sorting out troubles, and checking on networks. It makes managing smoother, fixes problems quickly, and keeps an eye on how the network behaves. But, because Telnet is not safe for secret info, choosing secured methods is essential.
The Telnet Protocol in Action
Here is a simple guide on Telnet:
- A user starts the Telnet client on their machine.
- They enter the remote’s IP or domain into the client.
- The client then connects the local and remote systems.
- After connecting, the user types commands into the client.
- The client sends these commands to the remote end.
- The remote processes them and returns immediate feedback.
This back-and-forth lets users interact with the remote system through Telnet. They can do many tasks remotely. This includes setting up networks, sorting out problems, and handling resources.
Understanding Telnet helps users enhance their remote work and troubleshooting skills.
Prerequisites for Using Telnet on Windows
Before trying Telnet on Windows, you should know a few things. Here’s what you’ll need:
- A Windows system with admin rights – You must have admin access. This lets you change settings and turn on Telnet.
- Command prompt access – You’ll use the command prompt for Telnet commands. Make sure you can open it on your system.
- An IP address or domain and port – For Telnet, you need an address and a port. Be sure you have these details ready.
Telnet isn’t ready to use right out of the box on Windows. You must turn it on first. You can do this in the Control Panel or via command prompt. Once enabled, Telnet lets you connect remotely and solve issues. Next, we’ll explore enabling Telnet on Windows 10.
How to Enable Telnet on Windows 10
Turning on Telnet in Windows 10 is simple. You can do it through the GUI or the command prompt. These methods let you use Telnet Client for remote access. We’ll show how to enable Telnet using both ways.
Method 1: Using the GUI
- Open the Control Panel on your Windows 10 computer.
- Choose “Programs and Features” from the list.
- Click “Turn Windows features on or off” in the new window.
- Find the “Telnet Client” option in the Windows Features window.
- Tick the box next to “Telnet Client” to activate it.
- Press “OK” to confirm your changes.
The Telnet Client is now set up and ready on your Windows 10 system.
Method 2: Using the Command Prompt
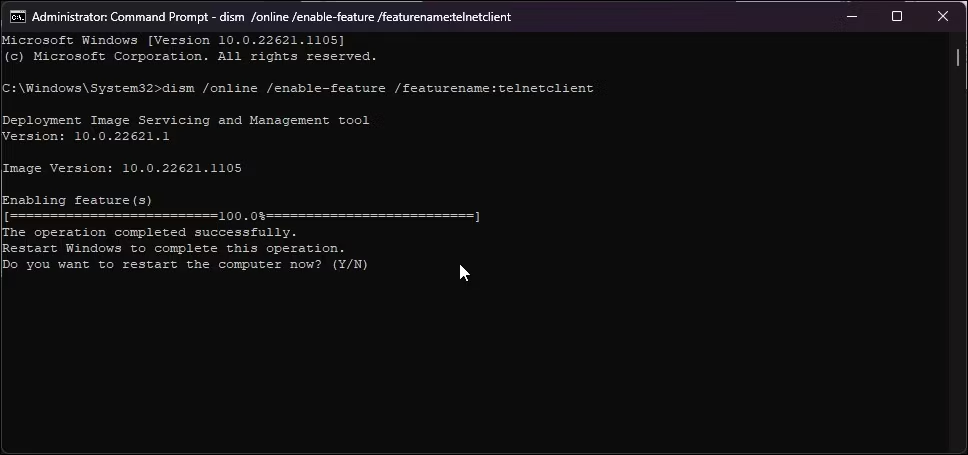
- Open the Command Prompt on your Windows 10. Do this by typing “cmd” in the search bar. Then select the Command Prompt app.
- Input
dism /online /Enable-Feature /FeatureName:TelnetClientand hit Enter. - Wait until the command finishes and Telnet is installed.
Once you complete any method, Telnet will work on your Windows 10. You can connect remotely and troubleshoot with Telnet Client.
Remember, turning on Telnet may make your system less secure because it’s not encrypted. Be careful using Telnet. Think about using more secure options like SSH for important tasks.
| Method | Advantages | Disadvantages |
|---|---|---|
| GUI | Easy to use | May not be available on all Windows 10 editions |
| Command Prompt | Allows more control | Needs knowledge of command-line |
Using Telnet on Windows 10 – Testing Open Ports
One main use of Telnet on Windows 10 is checking open ports on other systems. By entering the Telnet command with a system’s address and port, users can see if a port is open. This is crucial for solving network problems and understanding connectivity issues.
To test ports, start a Telnet session to the desired IP and port. The command tries to connect to that system. If the port is open, the Telnet session starts, allowing users to interact. If not, it shows the port is closed or unreachable.
Network admins and IT professionals find this Telnet feature useful. It helps them quickly see any connectivity problems or wrong settings affecting the network. They can fix issues fast by knowing if a port is open or closed.
An administrator might need to check if a web server’s port 80 is open. They’d open a command prompt and type the Telnet command with the server’s IP and port 80. A successful connection means port 80 is open. A failed attempt shows it’s closed.
Benefits of testing open ports with Telnet
- Quick and straightforward: Telnet makes it easy to check port statuses on distant systems.
- Effective troubleshooting: Knowing if a port is open or closed helps network admins solve connectivity issues fast.
- Verification of configurations: Using Telnet ensures network setups are correct and working as they should.
In summary, Telnet on Windows 10 is great for checking open ports, aiding in network troubleshooting and diagnostics. By using Telnet to check connection statuses, users can understand port accessibility and tackle networking problems efficiently.
Conclusion
Telnet is great for remote access and fixing problems on Windows 10. It lets users set up network gear and check open ports easily. But, it’s important to know that using Telnet could risk security. Users must be careful to keep data safe.
Turning on Telnet on Windows 10 is easy through the Control Panel. Just follow the steps in this guide. With Telnet, you can troubleshoot network issues or handle systems from afar. It’s a helpful tool that works well.
However, be cautious with Telnet since it’s not secured and has weaknesses. It’s better to use something like Secure Shell (SSH) for safer data sending. If you’re up to date and careful, you can benefit from Telnet on your Windows 10 device without risking your data.
FAQ
How do I install the Telnet client on Windows 10?
To install the Telnet client on your Windows 10, firstly open the Control Panel. Then, select Programs and Features, and click to turn Windows features on or off. Finally, find and tick the box next to Telnet Client, and click OK. This action will successfully install the Telnet client on your computer.
What is Telnet and how do I enable it on Windows 10?
Telnet lets you remotely access other computers. To enable it on Windows 10, first open the Control Panel. Then, pick Programs and Features and click to turn Windows features on or off. Next, tick the box for Telnet Client, and press OK. This will turn the Telnet Client feature on for your computer.
What are the security implications of Telnet?
Telnet is a text-based protocol that is not secure as it does not encrypt data. This exposes it to risks like spying, middleman attacks, and data tampering. When using Telnet, it’s vital to have secure passwords and perhaps opt for a safer alternative like SSH for encrypted data transmission.
How does Telnet work?
Telnet creates a connection for text-based communication between computers. To start, the Telnet client uses the IP or domain of the system you want to reach. Once connected, you can send commands and get real-time responses, which helps with remote administration and solving problems remotely.
What are the prerequisites for using Telnet on Windows?
Before using Telnet on Windows, ensure you have a Windows OS with admin rights and access to the command prompt. You also need the address and port you wish to check. Remember, Telnet is not automatically on in Windows, so you must enable it through the Control Panel.
How do I enable Telnet on Windows 10?
There are two ways to turn on Telnet on Windows 10. The first is through the Control Panel, selecting Programs and Features, then activating the Telnet Client. The other method is using a command in the command prompt. Both will enable the Telnet Client on your Windows 10.
How can I use Telnet on Windows 10 to test open ports?
Using Telnet on Windows 10, you can check for open ports on other systems. Do this by entering the Telnet command with the system’s address and port number. This lets you see if a port is open or not, aiding in network troubleshooting and identifying connectivity problems.
What are the benefits of enabling the Telnet client on Windows 10?
Enabling the Telnet client on Windows 10 gives you the ability to remotely access computers, troubleshoot, perform remote administration, and develop software. It’s useful for configuring network devices, checking ports, and other tasks needing text-based communication with distant systems.
