Adding more storage to your Windows 11 can greatly improve its performance. Many people find they run out of space due to larger files and apps. This guide will help you add a second SSD. It covers getting the right tools, opening your computer, and attaching the new SSD. You’ll also learn to secure the SSD, close everything up, and set up the BIOS.
Increasing file and application sizes: Bigger files and apps mean our single SSD might not have enough room. We might have to delete things, which limits what we can keep and do.
Storage limitations: A single SSD can only hold so much because of its size or tech. This makes it hard to add or enjoy new software, games, or media.
Impact on system performance: When our main SSD is almost full, our computers start to slow down. Apps might load slowly, it could take longer to start up, and things might not run as smoothly.
Add a second SSD, and you have way more room for all your stuff. This helps your system run better.
More space also means your main SSD can stay tidy and work at its best. You’ll have a smoother experience using your computer.
With the importance of a second SSD clear, let’s move on to how you can install it on your Windows 11 system.
Gather Necessary Tools and Components
To add a second SSD to your Windows 11 machine, you need the right tools and bits. Make sure to get these ready before you start. This will make the installation quicker and smoother.
Tools and Components
Here’s what you’ll need:
An additional SSD: This can be the same type and model as your existing SSD or a different one, depending on your storage preferences.
Appropriate screwdrivers: Make sure you have the correct screwdrivers to remove and install screws for the SSD and your computer’s case.
SATA and power cables: These cables will be used to connect the second SSD to the motherboard and provide power.
Adequate workspace: Find a clean, well-lit area where you can comfortably work on your computer without any distractions.
Having these things ready streamlines the installation. It reduces delays or issues.
Tools and Components
Description
An additional SSD
An extra solid-state drive (SSD) to be installed alongside your existing SSD
Appropriate screwdrivers
Screwdrivers matching the type of screws used in your computer’s case
SATA and power cables
Cables for connecting the second SSD to the motherboard and providing power
Adequate workspace
A clean and well-lit area where you can comfortably work on your computer
With all the necessary tools and parts in hand, you’re set to install your second SSD in Windows 11.
Open Your Desktop or Laptop Case
Before you add a second SSD, you’ll need to open your computer. This is important to get to the parts you need for the install. There’s a different way to do this for desktops and laptops, so we’ll show you both.
Opening a Desktop Case
To start with a desktop:
Turn your desktop off completely.
Unplug all cables, like the power cord and connections to the monitor, keyboard, and mouse.
Put your desktop on a stable, clean spot. Make sure there’s enough room for you to work.
Find and remove the screws or latches that keep the side panel on.
Take off the side panel to see the inside parts.
Now you can easily reach the desktop’s interior for the second SSD install.
Accessing Internal Components in a Laptop
For a laptop, the steps can differ based on the model. Always check the manual that came with your device for specific directions on how to get inside. Yet, here are some general steps:
Use your laptop’s manual or the manufacturer’s website to find how to open it.
Do as instructed, which might mean unscrewing or unclipping the bottom panel of your laptop.
Remove the panel gently to avoid hurting any parts inside.
With the panel off, you can now get to the parts needed for adding another SSD.
Once you’ve opened your computer properly, you’re set to continue to the following part where you connect the new SSD.
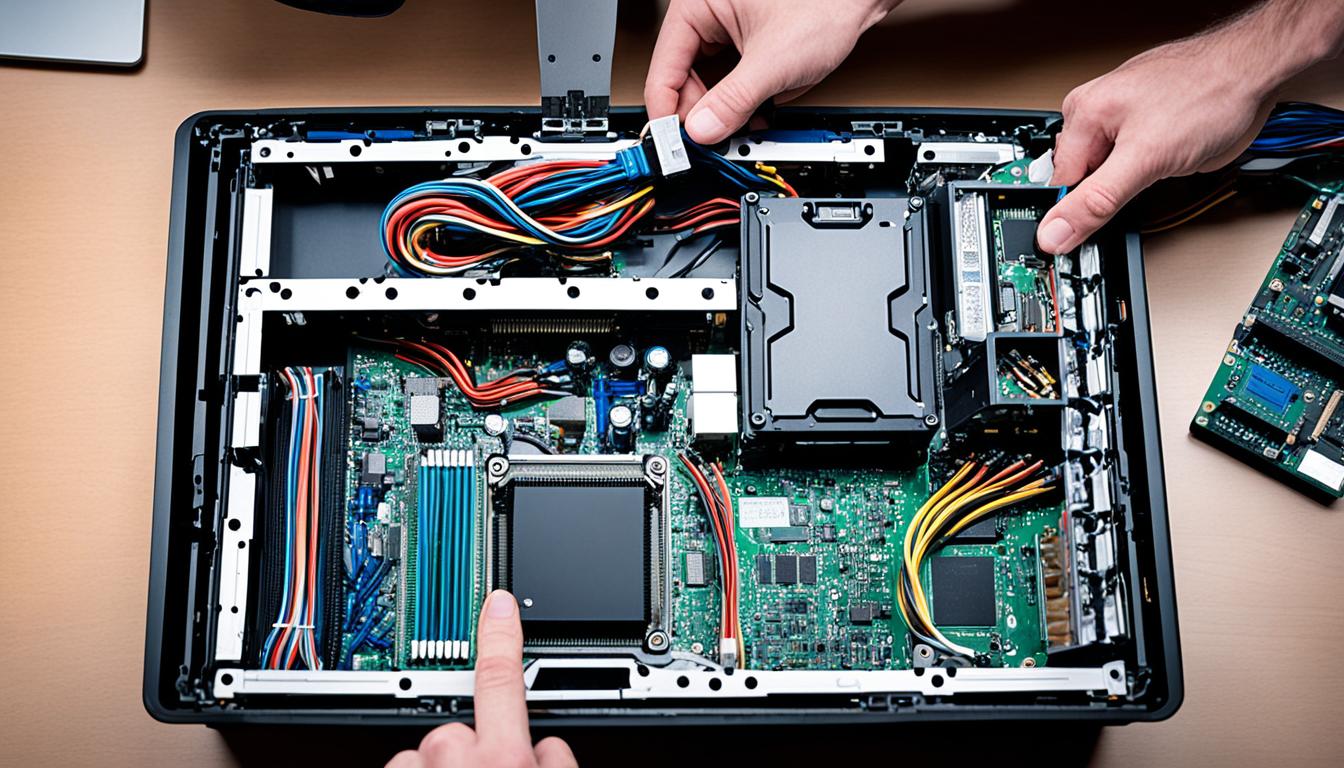
Connect the Second SSD
Open your case to add a second SSD to your Windows 11 PC.
Gather the necessary cables
You’ll need a SATA cable and a power connector. These ensure your new SSD connects properly to the motherboard.
“The SATA cable allows data transfer between the second SSD and the motherboard, while the power connector supplies the necessary power for the SSD to function.”
Start by finding an empty SATA port on the motherboard. Put one end of the SATA cable into the port. Make sure it fits well.
“A SATA port is a dedicated interface on the motherboard specifically designed for connecting storage devices like SSDs.”
Now, attach the other end of the SATA cable to the SSD. Make sure the connectors are lined up and push until they connect.
Next, find an unused power connector from the power unit. Connect it to the SSD securely.
“The SATA port is used to establish a data connection between the second SSD and the motherboard, while the power connector provides the necessary power for the SSD to function optimally.”
After hooking up the SATA cable and power connector, you’ve done the key steps. You’ve now connected the second SSD to your Windows 11 system.
Secure the SSD in Place
After you’ve connected the second SSD, make sure to fasten it securely. This stops it from moving and getting damaged. How you secure it depends on if you’re working on a desktop or a laptop.
Desktop Installation
For a desktop, you can fix the second SSD with screws in a drive bay. Here’s what to do:
Find an empty drive bay inside your desktop case.
Put the SSD into the bay, making sure the screw holes line up.
Use the right screwdriver to tighten the screws, ensuring the SSD is firmly in place.
Laptop Installation
If you’re installing the SSD in a laptop, check the manual for how to secure it. Each brand and model has its own way. The manual will have all the steps you need.
If you don’t have the manual, you can look on the manufacturer’s website or contact their support team for help.
It’s very important to fasten the second SSD properly. It keeps the SSD stable and working well. This means there’s less chance of it disconnecting or getting damaged, which could ruin your data.
With the SSD safely in place, we can now finish up by closing the case and turning your system back on.
Close the Case and Power On
Now that you’ve got the second SSD set, it’s time to wrap things up. You’ll need to close the case, plug in all the cables, and turn your system on. Doing this right ensures that the new SSD works perfectly.
Desktop Users:
Desktop users, follow these next steps:
Reconnecting Cables: Make sure every cable, like SATA and power cables, is connected right to the motherboard and power supply. Double-check everything. Ensure there’s nothing loose or in the way of closing the case neatly.
Closing the Case: Put the side panel back on carefully. It should match up with the case’s edges and holes. Then, secure it with the right screws tightly.
Powering On: With the case closed and cables in place, hit the power button. Wait for the boot-up. You did it! The second SSD is set to go.
Laptop Users:
If you’re on a laptop, do as follows:
Reconnecting Cables: Plug back any cables, like the power cable, you had to remove. Make sure nothing’s loose or blocking anything inside the laptop.
Securing the SSD: If your laptop had special instructions for the SSD, follow those closely. Screw or clip everything as told in the manual.
Powering On: Now that everything’s in place, press the power button. Let the laptop boot up. Enjoy the extra storage your second SSD brings.
Be sure to check your system afterwards. You want to make sure the BIOS or Disk Management sees the new SSD. This confirms everything’s set up right and you’re ready to optimise the new SSD’s performance.
Summary
By following this guide, installing a second SSD in Windows 11 is simple. You’ll just need the right tools and parts. Then, open your case, hook up the SSD, secure it, close everything up, and turn the power on. Once done, your device will have more space and work faster, thanks to the new SSD.
BIOS Configuration
After adding a second SSD, it’s key to set up the BIOS correctly for the best performance. Once the physical setup is done, the next step is handling the settings in Windows 11. Go to Disk Management to find and set up your new SSD.
In Disk Management, pick your new SSD and start the initialization. This makes the SSD ready for your computer to use. You then must format the SSD to a system like NTFS. This lets you save and access your files on it.
Next, we need to adjust the BIOS settings. Restart your computer and press the special key (like F2, F10, or DEL) to get into the BIOS. Look for the storage settings. Make sure your new SSD shows up and is set as a boot device.
Also, look for any SSD-specific settings in the BIOS, such as turning on AHCI mode. If you’re not sure, check the manual for your motherboard or their website. Getting these BIOS settings right means your new SSD will work well in Windows 11, giving you more storage.
FAQ
Why is adding a second SSD to my Windows 11 system necessary?
Adding a second SSD helps handle larger files and apps. It also boosts your system’s speed.
What tools and components do I need to install a second SSD?
You’ll need the new SSD, screwdrivers, SATA and power cables, plus a clean workspace.
How do I open my desktop or laptop case?
Desktops require turning off, unplugging, and opening the case. For laptops, check the manual for specific opening instructions.
How do I connect the second SSD to my Windows 11 system?
Connect the SSD to the motherboard with a SATA cable. Then, use a power connector for electricity.
How do I secure the second SSD in place?
In desktops, use screws to fix the SSD in a drive bay. Laptop users should consult their manual to make sure the SSD is secured right.
What should I do after securing the second SSD?
After installation, close the case and plug in all cables. Turn on the system, making sure all connections are tight.
How do I configure the BIOS settings after installing the second SSD?
Open Disk Management in Windows 11. Initialize the new SSD and adjust the BIOS for optimal storage use.
Welcome to our guide on installing Proxmox on Windows 11. If you aim to improve server management through virtualization, you’ve found the right tutorial. We will guide you through the…
The Snipping Tool is a built-in app for screenshots in Windows 10 and 11. It lets you capture shots, mark them, and share quickly. Here’s how to get it on…
Windows 11 usually asks for a Microsoft account during setup. But some may want to skip this for privacy reasons or if they plan to sell the device. Luckily, you…
When trying to install NVIDIA drivers on Windows 11, you might see a “NVIDIA Installer failed” error. This stops you from installing the needed drivers for your NVIDIA Graphics GPU….
Being an IT expert means knowing Active Directory Users and Computers (ADUC) inside out. It’s key for managing a Windows Active Directory (AD) domain well. With ADUC, you can handle…
If you’re planning to upgrade to Windows 11, picking the right SSD is key. Windows 11 comes with cool new features and improvements. Yet, it requires your SSD to meet…