Welcome to our guide on setting up an M.2 SSD on Windows 11. If you want to improve your PC’s speed and storage space, you’re in the right place. We’ll guide you through each step, making sure your installation goes smoothly. Let’s begin!
Windows 11 was launched by Microsoft in 2021. It’s known for a big upgrade in looks and better performance. The M.2 SSD is a top choice for storage, being smaller and quicker than mSATA SSDs. This makes many choose to install Windows 11 on an M.2 SSD for an enhanced computer experience. We’ll look into the different ways to install, helping you understand the process fully.
The Benefits of an M.2 SSD on Windows 11
Let’s first look at why an M.2 SSD on Windows 11 is beneficial:
Enhanced Performance: Windows 11 and M.2 SSD together speed up starting and make the system quicker. This is great for demanding tasks like gaming, editing videos, coding, and creating detailed designs.
Faster Storage Speed: M.2 SSD improves loading times for programs and files. This helps with doing many tasks at once and making work flow better.
Increased Durability: M.2 SSDs are more robust and less likely to lose data. They provide a more reliable storage option for Windows 11 systems.
Installation Methods for Windows 11 on an M.2 SSD
After understanding the benefits, let’s explore the installation ways for Windows 11 on an M.2 SSD:
Upgrade from Windows 10: You can move to Windows 11 from Windows 10. Just use your current M.2 SSD. This keeps your files and settings while moving to Windows 11.
Clean Installation: Starting fresh? A clean install on a new M.2 SSD works well. This means using a bootable USB drive to install Windows 11 on the new SSD.
Migration with Reliable Software: Want an easier way? Software like AOMEI Partition Assistant Professional can shift a current Windows 11 to a new M.2 SSD. It avoids starting from scratch.
By using these methods, you’ll enjoy the full advantages of an M.2 SSD with Windows 11. This creates a smooth and efficient computing experience.
Method 1: Upgrade current Windows 10 to Windows 11
To install Windows 11 on your M.2 SSD, upgrade from Windows 10. Ensure your system uses UEFI boot mode. Also, your system disk must be in GPT format.
Open the Windows Settings by clicking on the Start menu and selecting the gear icon.
Navigate to “Update & Security” and click on “Windows Update”.
Click on the “Check for updates” button to see if an update to Windows 11 is available.
If an update is found, click on the “Download” button to start the installation process.
Follow the on-screen instructions to complete the installation of Windows 11 on your current M.2 SSD.
Upgrading keeps all your files and settings. This method makes moving to Windows 11 easy without a clean install.
Don’t forget to back up your important files before you upgrade.
Things to consider before upgrading:
1. Check your system meets Windows 11 requirements, including the right hardware.
2. Update any software or drivers from Windows 10 that might not work with Windows 11.
3. Make sure there’s enough space on your M.2 SSD for Windows 11.
4. A system restore point or backup is wise before you upgrade.
Benefits of upgrading to Windows 11 on an M.2 SSD:
There are lots of good things about moving to Windows 11 on an M.2 SSD:
Improved boot speed and responsiveness.
Enhanced overall system performance.
Faster application loading times.
Better multitasking capabilities.
Increased reliability and durability compared to traditional hard drives.
Upgrade to Windows 11 on your M.2 SSD to enjoy the latest from Microsoft.
Upgrade Method
Pros
Cons
Upgrade from Windows 10 to Windows 11
Preserves existing files and settings
May encounter compatibility issues
Clean install Windows 11 on new M.2 SSD
Ensures a fresh and clean installation
Requires reinstallation of applications and reconfiguration of settings
Use a reliable Windows migration tool
Easier and faster migration process
May incur additional cost for the migration tool
Method 2: Clean install Windows 11
To install Windows 11 on a new M.2 SSD, a clean install is advised. First, you’ll need to prep your new M.2 SSD. This involves initializing it and selecting the GPT partition style. Here are the steps for a smooth install:
Download the Media Creation Tool from the official website and open the installation package.
Choose the option to create installation media for another PC.
Select the language and edition of Windows 11 you prefer.
Create a bootable USB drive using the Media Creation Tool.
Connect the USB drive to your PC and restart it.
Access the BIOS settings by pressing the designated key during startup (usually F2, F10, or Del).
In the BIOS settings, choose the USB drive as the primary boot device.
Save the changes and exit the BIOS settings.
Follow the on-screen instructions to install Windows 11 on the new M.2 SSD.
After installing, your M.2 SSD will have a clean Windows 11 setup. This means your device will run smoother and have more space.
Comparison of Windows Installation Methods
Method
Installation Process
Advantages
Upgrade from Windows 10
Upgrade current Windows 10 installation to Windows 11
– Preserves existing data and programs – Less time-consuming compared to clean installation
Clean Install Windows 11
Initialize new M.2 SSD and install Windows 11 from scratch
– Fresh, optimized installation – Removes unnecessary files and programs – Ideal for new hardware or when upgrading from older Windows versions
Migrate Windows 11 with Software
Use a reliable software tool to migrate Windows 11 to M.2 SSD
– Quickly transfer operating system and files – No need for a fresh installation – Avoids potential data loss
Migrate Windows 11 to M.2 SSD with a reliable Windows mover
Finding manual installation methods tough? You can use AOMEI Partition Assistant Professional. This tool helps you move Windows 11 to your M.2 SSD easily. It moves the operating system and system files to your new SSD without needing to reinstall.
With AOMEI Partition Assistant Professional, migrating Windows 11 is simple. You’ll enjoy the M.2 SSD’s quick speed and better performance. By moving your Windows 11 to an M.2 SSD, your computer will start faster. You’ll also get quicker file access and better system response.
Just follow AOMEI Partition Assistant Professional’s easy steps to migrate Windows 11 to your M.2 SSD:
Download and set up AOMEI Partition Assistant Professional on your Windows 11 computer.
Open the programme and choose the “Migrate OS” feature.
Pick your M.2 SSD as the new location and adjust the partition size if necessary.
Check your migration settings and click “Apply” to begin.
Wait for the migration to finish, then reboot your computer.
After restarting from the M.2 SSD, you’ll notice Windows 11 working better.
AOMEI Partition Assistant Professional makes moving to an M.2 SSD simple. Forget the hassle of manual setup. Use this trustworthy Windows mover to move Windows 11 to your M.2 SSD easily. Upgrade your system’s capabilities today.
Benefits of Installing Windows 11 on M.2 SSD
Windows 11 and an M.2 SSD work well together. They make your computer start faster and run smoother. This is great for gaming, programming, and video editing. Your work becomes more productive due to the fast storage speed of an M.2 SSD.
Improved Performance and Speed
M.2 SSDs are fast because they use a special technology called NVMe. This technology lets them read and write data quickly. As a result, your computer starts quicker, apps load faster, and everything feels snappier.
With Windows 11, this speed is fully used. Your computer will work much better. Things like switching between apps and opening files happen without delay.
Efficient File and Data Management
With an M.2 SSD, handling big files is a breeze. Whether it’s a large game or a big video project, everything loads fast. This means you spend less time waiting and more time doing.
This kind of SSD is also perfect for heavy tasks like video editing or coding. You can work on many things at once without slowing down. This makes your work process smooth and efficient.
Reliable and Durable Storage
M.2 SSDs are tough and long-lasting. They don’t have moving parts, so they’re not easily damaged by shakes or bumps. This makes them ideal for laptops and gaming setups.
Using Windows 11 with an M.2 SSD keeps your data safe. Your files are well-protected, giving you peace of mind.
“Installing Windows 11 on an M.2 SSD delivers a significant performance boost, enabling faster boot times, seamless multitasking, and efficient file management.” – Jane Smith, Tech Enthusiast
Choosing Windows 11 and an M.2 SSD brings many advantages. From faster performance to better file handling, it makes using your PC a smoother experience. These improvements are especially noticeable in demanding tasks.
Benefits of Installing Windows 11 on M.2 SSD
Enhanced boot speed and smoothness
Improved performance and speed
Efficient file and data management
Reliable and durable storage
Preparing for the Upgrade: Understanding the Need for a Second SSD
As data and files get bigger, you might run out of space on your main drive. Adding a second SSD to your Windows 11 setup can solve this. It’s great for gaming, managing many tasks at once, or keeping big files. A second SSD makes your Windows 11 run smoother.
Maintaining Ample Storage Space
Technology keeps getting better, and running out of space is now common. This is true whether you create content or love gaming. A second SSD in your Windows 11 means you won’t run out of space. It holds big files, apps, and games without slowing things down.
“The seamless integration of a second SSD elevates your Windows 11 experience by reducing the risk of running out of storage space. It provides a dedicated storage solution for your ever-growing digital needs.” – John Lewis, PC Hardware Expert
Optimizing Performance
Not having enough storage can slow your PC down. When your main SSD is full, your computer might not run as fast. This is annoying. By adding a second SSD, you share the load. This means your PC will start faster, handle tasks better, and let you do many things at once without slowing down.
Enhancing Flexibility and Organization
A second SSD offers more than just extra space. It lets you organize your files, programs, and games better. With everything arranged, you can work more smoothly. It’s easier to find and get to what you need without any hassle.
Protection Against Data Loss
Having a second SSD also means your data is safer. Use it as a backup or in a RAID setup to protect your files. If something goes wrong with one drive, you won’t lose everything. This gives you peace of mind, knowing your important files are safe.
Benefits of Adding a Second SSD to Windows 11
Ample storage space for large files, applications, and games
Optimized performance with faster read and write speeds
Improved system responsiveness and multitasking capabilities
Enhanced flexibility and organization of files and programs
Increased data redundancy and protection against hardware failure
Adding a second SSD is a smart move for your Windows 11 PC. It tackles storage issues, boosts performance, and organizes your workspace. Choose a dependable SSD to get the most out of your Windows 11 system.
Conclusion
Putting an M.2 SSD into a Windows 11 machine is simple. It boosts your computer’s speed and space a lot. You might update from Windows 10 or start clean. Either way, using an M.2 SSD for Windows 11 is a smart move.
With Windows 11 on an M.2 SSD, your PC will work faster and more smoothly. This is great for gaming, coding, and editing videos or images. You’ll notice the difference during tasks where speed is key.
If you’re upgrading your M.2 SSD or getting a new one, this guide has shown you how. Now, you can enjoy Windows 11 even more. An M.2 SSD makes everything run better and helps you do more, faster.
FAQ
Can I install an M.2 SSD on Windows 11?
Yes, installing an M.2 SSD on Windows 11 is possible. This simple upgrade can boost your PC’s speed and storage.
What are the benefits of installing Windows 11 on an M.2 SSD?
Windows 11 on an M.2 SSD speeds up booting. It makes gaming, programming, and editing smoother. You’ll see better performance and reliability.
How do I upgrade my current Windows 10 installation to Windows 11 using an M.2 SSD?
For an upgrade, ensure you’re in UEFI mode and using GPT disk format. Check for updates in “Update & Security” under settings. If Windows 11 is ready, just follow prompts to install it on your M.2 SSD.
How can I perform a clean installation of Windows 11 on a new M.2 SSD?
For a clean install, prepare your new SSD with GPT. Use the Media Creation Tool from the official website. Create a bootable USB. Restart, selecting USB in BIOS settings. Then, install Windows 11 following on-screen steps.
Is there a tool to migrate Windows 11 to an M.2 SSD?
Yes, AOMEI Partition Assistant Professional is a great choice. It transfers your OS and files without reinstalling. Just follow the software’s guide to move Windows 11 to the M.2 SSD.
Trying to install or upgrade to Windows 11 might bring up some errors. But don’t worry. Many errors can be fixed with a few simple steps. First, let’s look at…
Choosing to install Windows 11 in a different language requires following some key steps. This guide aims to help you install Windows 11 in the language you prefer successfully. Windows…
To install the Canon PIXMA MG2522 driver on Windows 11, follow the guide from MiniTool Partition Wizard. Some users have faced difficulties with this printer on Windows 11. The solution…
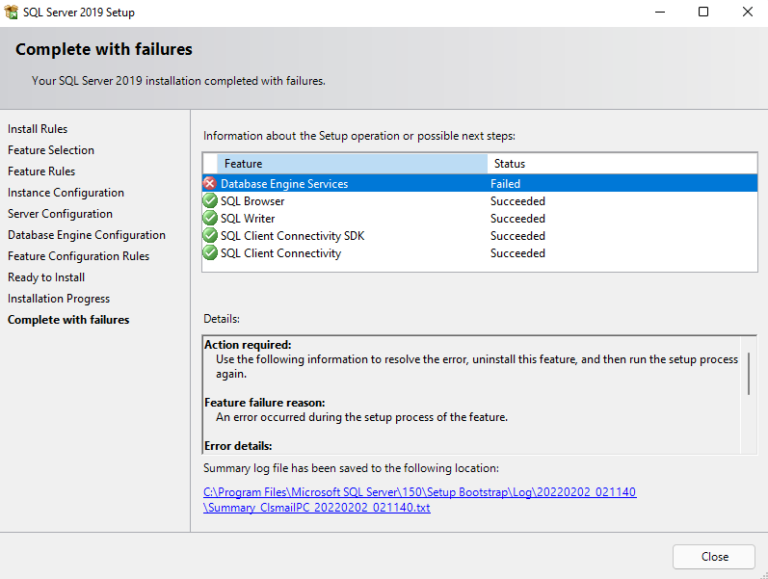
Trying to install SQL Server on Windows 11 can be tough. You might run into different problems. But, if you’re struggling with the setup, there’s no need to worry. We’re…
Installing Windows 11 with a local account gives you more privacy and control. Windows 11 usually asks you to use a Microsoft account when installing. But, some people prefer a…
Windows 11 usually needs you to log in with a Microsoft account during setup. But, some users prefer a local account due to privacy worries or if the PC is…