Welcome to our guide on installing Proxmox on Windows 11. If you aim to improve server management through virtualization, you’ve found the right tutorial. We will guide you through the setup of Proxmox, making the installation easy.
Our guide covers everything you need: hardware needs, GPU passthrough, setting up a Windows 11 VM, and more. Follow our steps to smoothly install Proxmox on your Windows 11 system. This will make managing servers easy.
First, we’ll look into the hardware setup needed for Proxmox on Windows 11.
Before setting up Proxmox on Windows 11, make sure your hardware is up to the mark. We refer to Proxmox VE version 8.1.3 and list compatible hardware like CPUs and GPUs.
Also, turning on virtualization settings in the BIOS is crucial. Settings like “virtualization,” “VT,” or “IOMMU” need activation. We will show you how to check and manage IOMMU groups for smooth GPU passthrough.
Let’s prepare your hardware for installing Proxmox on Windows 11.
Hardware Requirements and Configuration
Before putting Proxmox on Windows 11, make sure your computer is up to the job. This guide, which uses ProxmoxVE version 8.1.3, lists all the hardware you’ll need, like CPUs, motherboards, and GPUs.
For the best results with Proxmox on Windows 11, you must turn on certain settings in the BIOS. Look for “virtualization,” “VT,” or “IOMMU” settings and switch them on. These settings help Proxmox use all its virtual powers to the fullest.
To use a GPU properly with Proxmox, checking your IOMMU groups is key. You might have to adjust them for the GPU to work right. This guide tells you how to get your computer ready for Proxmox on Windows 11.
Hardware Compatibility
Below is a table outlining the compatible hardware for ProxmoxVE version 8.1.3:
Component
Minimum Requirements
Recommended Requirements
CPU
Intel Core i5-4th generation or later
Intel Core i7-6th generation or later
Motherboard
Supports VT-d or AMD IOMMU
Supports VT-d or AMD IOMMU with GPU passthrough compatibility
GPUs
Compatible graphics cards with VT-d or IOMMU support
NVIDIA GeForce GTX 1070 or AMD Radeon RX 5700 XT
Make sure your hardware is good enough for ProxmoxVE version 8.1.3. It’ll help everything run smoothly and work well together.
Preparing the GPU for Passthrough
To use GPU passthrough in Proxmox on Windows 11, you need to prepare your GPU correctly. This includes loading the right vfio kernel modules and making sure that GPU drivers don’t load. By doing these steps, your GPU will be ready for passthrough.
Loading vfio kernel modules: First, add the vfio kernel modules to the /etc/modules file. Open this file in a text editor and add these lines:
vfio
vfio_iommu_type1
vfio_pci
vfio_virqfd
Blacklisting GPU drivers: To stop GPU drivers from loading, blacklist them. Do this in the /etc/modprobe.d/pve-blacklist.conf file. Add these lines with a text editor:
blacklist radeon
blacklist nouveau
blacklist nvidia
blacklist amdgpu
Blacklisting these drivers stops them from loading when the computer starts. This is key for a successful GPU passthrough.
Verifying module loading and absence of GPU drivers: After changing settings, check if the vfio kernel modules are loaded. You also need to make sure that the GPU drivers are not loaded. Open a terminal and use this command:
lsmod | grep vfio
If you see the vfio module names (vfio, vfio_iommu_type1, vfio_pci, vfio_virqfd), it means they loaded correctly. You can also use this command to check GPU drivers:
lsmod | grep -iE ‘radeon|nouveau|nvidia|amdgpu’
If there’s no output from this command, it proves that the GPU drivers aren’t loaded.
Following these steps for your Proxmox on Windows 11 setup will make sure your GPU is ready for passthrough. This leads to better virtualization and performance.
Creating a Windows 11 Virtual Machine
In this section, we will guide you through making a Windows 11 virtual machine (VM) in Proxmox. This step-by-step guide will help you set up everything for the best performance.
Select the appropriate settings for the VM
Choosing the right settings for a Windows 11 VM is crucial. Begin by picking the right graphics card. It helps you get the most out of your hardware. Moreover, you should select a machine type that meets your needs.
Configure the BIOS and disk settings
Configuring the BIOS settings correctly is essential for the VM to run smoothly. Ensure options like virtualization technology (VT) and IOMMU are turned on. These support virtualization. For disks, the SATA bus/device choice works best for both performance and compatibility.
Choose the network model
Picking a suitable network model is key for good VM connectivity. We suggest the Intel E1000 model for Windows 11 VMs. It offers reliable network performance.
Add the GPU to the VM
To boost graphics in your VM, add a dedicated graphics card. Do this using the “PCI Device” option. It lets the VM use the GPU directly, improving graphics in games and apps.
Configure the VM’s SMBIOS settings
Finally, don’t forget about the VM’s System Management BIOS (SMBIOS) settings. These settings tell the guest OS about the VM’s hardware. Make sure they match your VM setup for the best performance.
VM Configuration Settings
Settings
Recommendation
Graphics Card
Select the appropriate graphics card for optimal performance.
Machine Type
Choose the machine type that best suits your requirements.
BIOS Settings
Enable virtualization technology (VT) and IOMMU for virtualization support.
Disk Configuration
Use the SATA bus/device option for better performance and compatibility.
Network Model
Choose Intel E1000 for stable and reliable network connectivity.
GPU Passthrough
Add the GPU to the VM using the “PCI Device” option for enhanced graphical performance.
SMBIOS Settings
Configure the VM’s SMBIOS settings to align with the desired configuration.
By following these steps, you will have set up a Windows 11 virtual machine in Proxmox. It will be ready for any task you need.
Installing Windows 11 on the VM
To set up Windows 11 on your VM, simply follow these steps. This will make sure you have an easy time during the installation.
Begin by using the Windows 11 ISO. Put the ISO into your VM’s virtual CD/DVD drive.
Restart the VM. Be sure to press any key when it asks to boot from the CD.
The setup for Windows 11 will begin. Choose your language, keyboard layout, and more as instructed.
When asked for a product key, either skip or provide a valid one. Skipping means Windows 11 will work with some limits.
Choose “Custom: Install Windows only (advanced)” for a new install.
Pick the partition or disk for Windows 11.
Let the install finish. Your VM will restart a few times.
After installation, you’ll make a user account. It’s best to skip making a Microsoft account to avoid extra steps.
Last step, customize your Windows 11 by picking your time zone, privacy settings, and network preferences.
Well done! You’ve installed Windows 11 on your virtual machine.
While installing, don’t cheat in games or do things that aren’t allowed. This keeps your gaming fair when using Windows 11 VM.
Tips for a Successful Installation
Here are quick tips to help your Windows 11 installation go smoothly:
Check that your VM has enough RAM, CPU cores, and disk space.
Before installing, ensure your ISO file is good and not damaged. Check its hash value for confirmation.
If you hit any snags while installing, restart the VM and try again.
For the best experience, install the newest tools from your virtualization software.
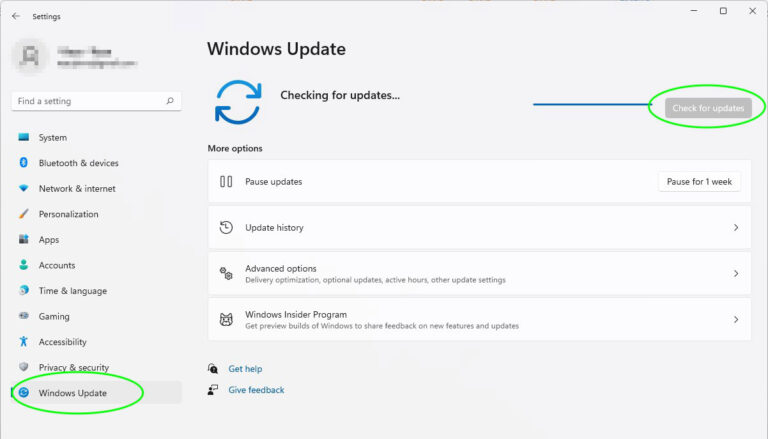
Keep your Windows 11 VM updated for security and performance boosts.
After a successful Windows 11 setup on your VM, you’ll be ready to test software, build apps, or check out the newest Windows features.
Verifying VM Configuration and Performance
After installing Windows 11 on a virtual machine (VM), it’s essential to check its setup and speed. This guide will help you confirm the VM’s setup and spot any speed problems.
Start by verifying if Windows recognises the VM. Use the “msinfo32” tool for this. Open it and go to “System Summary.” Check for info like the manufacturer, model, and BIOS version. If you see details about virtualization, Windows recognises your VM.
Seeing issues with the VM setup? Ensure you’ve followed the setup steps right. Recheck the BIOS settings. Make sure settings like “Virtualization,” “VT,” or “IOMMU” are on. These settings are crucial for the VM to work well.
Note: Do not mention or include any references to QEMU or virtual machines in the system information, as it may trigger EasyAntiCheat detection or other compatibility issues with certain applications.
Next, it’s vital to look at the VM’s speed. Keep an eye on important speed metrics. These include CPU, memory, and disk use. This makes sure your VM works at its best. Proxmox offers tools to check these, like its web and command-line interfaces.
Facing speed troubles? Try these steps:
Ensure the VM has enough CPU, memory, and disk space for your apps.
Look at the host system’s resources to find any issues.
Go over the VM’s setup options, like CPU model and memory use, to boost speed.
Get the latest Proxmox updates and fixes for known speed problems.
Checking and improving the VM setup and keeping an eye on its speed ensures a great virtualization experience with Proxmox and Windows 11.
USB Passthrough
In Proxmox on Windows 11, USB passthrough lets you link USB gadgets directly to a VM. This grants them full access and boosts performance. This part will show you how to do USB passthrough. It will stress finding the USB controller and show steps to make passthrough work.
Identifying USB Ports and Controllers
Before you start USB passthrough, you need to know which USB ports are with the same root controller. This means all the ports with the controller can go to the VM together. To find the USB ports and controller, use the “lsusb -t” command in the Proxmox terminal.
Example:
lsusb -t
Running this command shows you the USB ports and their controllers. Note the root controller that handles the ports you want to pass through.
Passing Through the USB Controller
It’s better to pass the whole root USB controller to the VM, not just single USB devices. This way, the VM gets all the USB ports under that controller.
To pass the USB controller:
Go to the Proxmox web page and find the VM’s hardware setup.
Click “Add” and pick “PCI Device” from the list.
You’ll see a list of PCI devices. Find and choose the root USB controller you noted before.
Finish setting up the VM and save your work.
By doing this, the VM will directly connect to all USB ports linked with the controller. This makes using USB devices easy.
Summary
USB passthrough in Proxmox on Windows 11 simplifies connecting USB devices to a VM. By figuring out the main USB controller and passing it to the VM, you get the best performance and access to the USB ports. Use the steps given here to set up USB passthrough in your virtual setup.
Conclusion
This guide helps you install Proxmox on Windows 11 and manage your servers well. It includes everything you need: hardware needs, setting up a virtual machine, and installing Windows 11. You’ll also learn how to check your VM setup and add USBs. This ensures a smooth setup for Proxmox VE and helps you manage virtual machines
Proxmox VE gives you great tools for server management. It makes creating and managing virtual environments easy. By following this guide, you can make your server work better, improve operations, and boost performance. Proxmox’s many features help you use server resources better, scale up easily, and become more reliable.
If you’re setting up virtual machines on Windows 11, whether you’re an IT pro or a system admin, this guide is essential. It gives you all you need to know for a successful Proxmox VE installation. With Proxmox VE, you can take charge of your servers and get the most out of virtualization.
FAQ
What are the hardware requirements for installing Proxmox on Windows 11?
To get Proxmox up and running on Windows 11, you’ll need the right hardware. This includes a CPU, motherboard, and GPUs that are compatible. Additionally, you have to enable virtualization in the BIOS settings. Look for terms like “virtualization”, “VT”, or “IOMMU”. Check that your gear meets these specs before starting the install.
How can I enable GPU passthrough in Proxmox on Windows 11?
For GPU passthrough in Proxmox on Windows 11, start by loading necessary vfio kernel modules. Then, blacklist the GPU drivers. You’ll find instructions for adding vfio modules to the /etc/modules file and blacklisting GPU drivers in the /etc/modprobe.d/pve-blacklist.conf file in the guide. These steps are key to making GPU passthrough work.
What is the process for creating a Windows 11 virtual machine in Proxmox?
Creating a Windows 11 VM in Proxmox means picking the right settings. Choose the graphics card, machine type, BIOS, and how you want the disks arranged. It’s best to go with LSI for the SCSI controller, SATA for disk bus/device, and Intel E1000 for the network. Also, adding the GPU using “PCI Device” and tweaking the SMBIOS settings of the VM are crucial moves.
How do I install Windows 11 on the virtual machine created in Proxmox?
Installing Windows 11 on your Proxmox VM starts with booting from the Windows 11 ISO. The guide shows you how to boot from the CD. Plus, it has tips to make sure the installation goes smoothly. Remember to press a key when prompted to boot from CD. It’s also a good idea to skip using a Microsoft account during setup.
How can I verify the configuration and performance of my Windows 11 VM?
To check your Windows 11 VM’s setup and performance, see if it’s recognised as a virtual machine by Windows. Use “msinfo32” to look up the system’s details like the maker, model, and BIOS version/date. The guide also talks about avoiding EasyAntiCheat detection. It suggests keeping mentions of QEMU or virtual machines out of your system info.
How can I set up USB passthrough in Proxmox on Windows 11?
Setting up USB passthrough in Proxmox for Windows 11 means identifying which USB ports are on the same root controller. Rather than passing through devices one by one, it’s smarter to pass through the entire controller. The “lsusb -t” command helps you spot the right USB ports. Then, just follow the steps to pass the USB controller to your VM.
If you own a Mac and wish to create a Windows 11 installation media, several methods exist. WonderISO is highly recommended for its ease and effectiveness. It helps create Windows…
After you install Windows 11, you must do a few important things. These steps boost performance, make your system safer, and give you a better experience. They help you change…
Being an IT expert means knowing Active Directory Users and Computers (ADUC) inside out. It’s key for managing a Windows Active Directory (AD) domain well. With ADUC, you can handle…
If you’re having trouble installing the EA app on Windows 11, you’re in good company. Installation problems are common for many users. This guide offers effective methods to smoothly solve…
Choosing to install Windows 11 in a different language requires following some key steps. This guide aims to help you install Windows 11 in the language you prefer successfully. Windows…