Are you using Windows 11 and wish to install IIS (Internet Information Services)? You’ve come to the right place! We’ll guide you step-by-step to install IIS on Windows 11. This will help you create a top-notch web server.
This guide is for you whether you know web development or are just starting. We’ll show you how to put IIS on your Windows 11 computer. Follow our instructions, and enjoy the advantages of IIS. These include hosting websites and web apps easily.
Ready to install IIS on your Windows 11 system? Just follow the steps below. They are easy to understand.
Navigate to Control Panel > Programs > Programs and Features > Turn Windows features on or off.
Expand the Internet Information Services node and select the necessary features.
Click OK to install the selected features.
After installation, a Default Web Site will be created. Verify the installation by entering “http://localhost/” in a web browser.
By sticking to these steps, you’ll smoothly install IIS on your Windows 11 computer. Then you can dive into all the features and tools IIS offers.
With IIS on Windows 11, enjoy a powerful web server. It will take your web projects further!
If you’re looking to host an ASP.NET website using IIS 8, you must first install IIS along with necessary ASP.NET modules. This setup varies by operating system. We’ll dive into the steps for both Windows Server 2012 and Windows 8.
To install IIS and ASP.NET modules on Windows Server 2012, you have two choices: using the IIS Manager UI or a command line interface. Ensure you have the right permissions to proceed.
IIS Manager UI: Launch IIS Manager, pick the server for installation, and click Add Roles and Features. Then, select Web Server (IIS) and the required features, including ASP.NET.
Command Line: Open a prompt or script and input this command: Start /w pkgmgr /iu:IIS-WebServerRole;IIS-WebServer;IIS-CommonHttpFeatures;IIS-StaticContent;IIS-DefaultDocument;IIS-DirectoryBrowsing;IIS-HttpErrors;IIS-ApplicationDevelopment;IIS-ASPNET;IIS-NetFxExtensibility;IIS-ISAPIExtensions;IIS-ISAPIFilter;IIS-HealthAndDiagnostics;IIS-HttpLogging;IIS-LoggingLibraries;IIS-RequestMonitor;IIS-Security;IIS-RequestFiltering;IIS-HttpCompressionStatic;IIS-WebServerManagementTools;IIS-ManagementConsole;WAS-WindowsActivationService;WAS-ProcessModel;WAS-NetFxEnvironment;WAS-ConfigurationAPI.
Windows 8
Installing IIS and ASP.NET modules on Windows 8 is similar to the process on Windows Server 2012. You can use either the IIS Manager UI or the command line interface for installation.
IIS Manager UI: Go to the Control Panel, look under Programs, and click Turn Windows features on or off. Make sure to check Internet Information Services. Expand Application Development Features and tick ASP.NET along with other necessary features.
Command Line: Open a command prompt or script and enter the same command used for Windows Server 2012.
Installation Comparison
Operating System
IIS Manager UI
Command Line
Windows Server 2012
✔
✔
Windows 8
✔
✔
The table above shows that both Windows Server 2012 and Windows 8 support IIS and ASP.NET module installation via the IIS Manager UI and command line. Select the method that best fits your needs and preferences.
After installing IIS and the ASP.NET modules, you’re all set. Now you can add your ASP.NET application to IIS. This step will let you host your site or web app on your Windows system.
Installing IIS and ASP.NET on Windows Server 2012 (UI)
Installing IIS and the ASP.NET modules on Windows Server 2012 via the UI is easy. Just follow these simple steps:
Open Server Manager and click on Add roles and features.
Choose Role-based or feature-based installation and pick the server for the installation.
Select Web Server (IIS) and include the necessary features, like ASP.NET.
Check your choices and then click Install.
After installing, verify it by typing “http://localhost” into a web browser. If you see the default IIS page, the installation succeeded.
Setting up IIS on Windows Server 2012 through the UI is simple. With a few clicks, you can get a web server ready with ASP.NET support. This means your server is all set to host your apps.
Installing IIS and ASP.NET on Windows 8 (UI)
To get IIS and ASP.NET modules on your Windows 8 using the UI, just follow these simple steps:
Open the Control Panel.
Go to Programs > Turn Windows features on or off.
Check the box for Internet Information Services.
Expand the Application Development Features node.
Select ASP.NET and any additional features needed.
Click OK to save the changes and wait for the install to finish.
After the install, you can check it by typing “http://localhost” in your web browser.
Setting up IIS and ASP.NET on Windows 8 through the UI is easy. It lets you have a strong web server on your Windows 8 machine. You can improve your web building skills with its built-in features.
Why Install IIS and ASP.NET on Windows 8?
IIS and ASP.NET are key for web making on Windows. IIS lets you host sites and web apps, offering a safe and solid base for your online work. With ASP.NET, you can make lively web apps using .NET’s power. Getting IIS and ASP.NET on your Windows 8 machine means you can explore a lot in web development.
Installing IIS and ASP.NET on Windows Server 2012 (Command Line)
To set up IIS and ASP.NET modules on Windows Server 2012 via the command line:
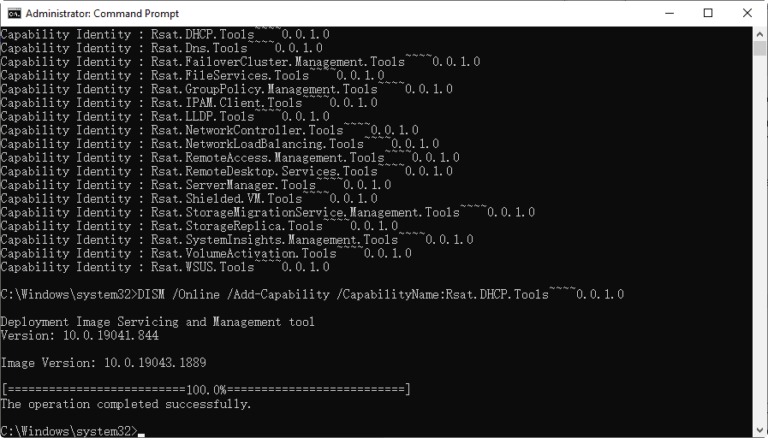
Open a Command Prompt or script and input this command:
Lastly, check if it works by going to “http://localhost” on your browser.
Adding an ASP.NET Application to IIS
To add an ASP.NET application to IIS, follow these steps:
Open IIS Manager.
Right-click on the desired site and click Add Application.
Specify an alias for the application URL and select the appropriate application pool.
Provide the physical path to the application’s folder on the server.
Optionally, configure additional settings and test the setup.
Click OK to add the ASP.NET application to IIS.
Adding an ASP.NET app to IIS lets you host dynamic web applications. Just follow the steps given, and you’ll be set.
You’ll benefit from IIS’s features and performance. It makes your app more powerful.
If you run into problems, check the IIS documentation. Or, you can ask the IIS community for help.
Conclusion
Setting up IIS on Windows 11 is easy. It helps you run a web server for websites and apps. Follow the guide and pick the right features for a successful setup.
You can use the UI or command line to install. Either way, it’s straightforward. With IIS installed, your web server will be reliable and work well on Windows 11.
IIS and Windows 11 give you everything needed for online success. Whether it’s a simple site or a complex app, IIS is a strong platform. Use this powerful duo to boost your online activities and make managing web services simpler.
FAQ
How do I install IIS on Windows 11?
To get IIS running on Windows 11, do this:
1. Go to Control Panel > Programs > Programs and Features > Turn Windows features on or off.
2. Open the Internet Information Services node and pick the features you need.
3. Hit OK to start installing the features you chose.
4. A Default Web Site comes up after installation. To check, type “http://localhost/” in your browser.
What do I need to do before adding an ASP.NET website on IIS 8?
Before putting an ASP.NET site on IIS 8, you should set up IIS. Also, add the ASP.NET modules needed. The setup might change with your operating system.
How do I install IIS and ASP.NET modules on Windows Server 2012 using the UI?
For IIS and ASP.NET modules on Windows Server 2012 with UI, follow these:
1. Go to Server Manager and click Add roles and features.
2. Choose Role-based or feature-based installation. Then pick the server to install on.
3. Select Web Server (IIS) and include ASP.NET and other needed features.
4. Confirm your choices and press Install.
5. Check the setup by going to “http://localhost” in your browser.
How do I install IIS and ASP.NET modules on Windows 8 using the UI?
To install on Windows 8 using UI, do the following:
1. Open Control Panel, head to Programs > Turn Windows features on or off.
2. Tick the Internet Information Services box and open the Application Development Features node.
3. Choose ASP.NET and any extra features you need.
4. Click OK, then wait for the installation.
5. Confirm by typing “http://localhost” in your browser.
How do I install IIS and ASP.NET modules on Windows Server 2012 using the command line?
Installing on Windows Server 2012 via command line involves:
1. Open Command Prompt or script and input the needed command.
2. Wait till the installation wraps up.
3. Verify by navigating to “http://localhost” in a browser.
How do I add an ASP.NET application to IIS?
Adding an ASP.NET app to IIS? Just do this:
1. Launch IIS Manager.
2. Right-click your chosen site and hit Add Application.
3. Set an alias for your application URL and pick the right application pool.
4. Point to the application’s folder server location.
5. You might want to tweak more settings and test.
6. Press OK to wrap up adding the app to IIS.
What is the conclusion of the IIS installation on Windows 11?
Putting IIS on Windows 11 is pretty direct. Pick the features you need and check the install with the IIS welcome screen. It doesn’t matter if you’re using UI or command line; just follow the steps for success. After installing IIS, you can host web sites and apps with ASP.NET on your Windows 11. Revel in the perks of a robust and efficient web server with IIS on Windows 11.
We’ll show you how to set up Remote Server Administration Tools (RSAT) on Windows 11. RSAT lets IT admins manage Windows Server roles and features from a Windows 11 PC….
Being an IT expert means knowing Active Directory Users and Computers (ADUC) inside out. It’s key for managing a Windows Active Directory (AD) domain well. With ADUC, you can handle…
Welcome to our guide on installing Proxmox on Windows 11. If you aim to improve server management through virtualization, you’ve found the right tutorial. We will guide you through the…
Welcome to our simple guide on setting up Fortnite on Windows 11. Are you eager to play this popular battle royale game on your PC? You’re in the perfect spot….
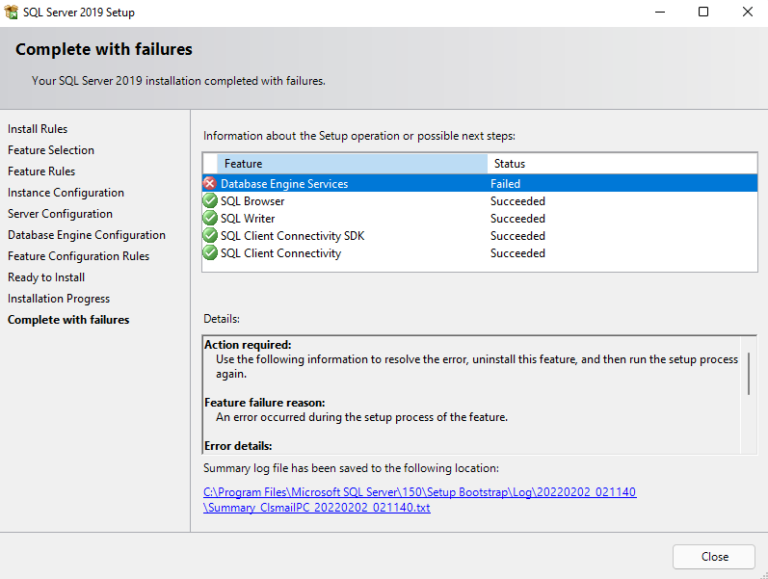
Trying to install SQL Server on Windows 11 can be tough. You might run into different problems. But, if you’re struggling with the setup, there’s no need to worry. We’re…
Encountering the ‘A Media Driver is Missing’ error during the Windows 11 USB setup can be frustrating. Luckily, there are different ways to tackle this problem. You can try using…