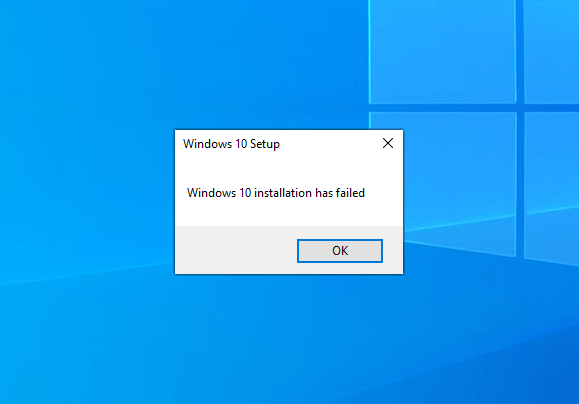
Have you seen the “Windows 10 installation has failed” message? You’re not alone. This error stops many from upgrading to Windows 10. Luckily, we’re here to help. We’ll show you several fixes, including removing extra devices and repairing system files. Follow our steps to get past this error.
Start by unplugging devices not needed for the setup. This includes printers, extra screens, and speakers. These devices can block the installation. After removing them, try installing Windows 10 again. Once updated, you can plug everything back in.
Clear Attribute of $WINDOWS.~BT Installation Folder
This error might happen if the installer can’t copy files properly. Solve this by changing the $WINDOWS.~BT folder’s settings. Open File Explorer, go to the C drive, show hidden items, and find this folder. Right-click on it, go to properties, uncheck Read-Only, and apply. Try the install again after this.
Uninstall Language Pack
Sometimes, language packs cause problems. If you’re upgrading from another Windows, remove any non-English language packs. For Windows 10, search for Language settings, switch to English, and remove others. On Windows 7, go to Change display languages in the Start menu and uninstall there. This might fix the error.
Rebuild Boot Configuration Data
Boot Manager issues can also trigger this error. Rebuilding Boot Configuration Data (BCD) might help. Use commands like bootrec /RebuildBcd, bootrec /fixMbr, and bootrec /fixboot in Command Prompt. Steps to open Command Prompt vary by Windows version. After doing this, check if the error is gone.
Perform a Clean Boot Installation
Software or driver conflicts might be the problem. A clean boot installation can identify and fix these issues. Disable unnecessary startup items and services through the System Configuration tool (msconfig). After restarting your PC, install Windows again. This method can solve compatibility problems.
If everything else fails, corrupted system files might be the culprit. Damaged files can block the installation. Use the System File Checker tool (sfc /scannow) to find and fix file issues. Or, try software like Fortect for a deeper scan. After fixing the files, attempt the installation once more.
Remove Peripheral Devices
Disconnect unnecessary devices like scanners, printers, and speakers from your PC to fix the “Windows 10 installation has failed” error. These devices can sometimes cause problems during the installation. By unplugging them and trying the installation again, you might solve the issue. Once the update is successful, you can reconnect these devices.
Taking out peripheral devices helps avoid conflicts during the install. This makes setting up Windows 10 smoother and error-free. Remember, some devices need updated drivers to work with Windows 10. After installing, visit the manufacturers’ websites for the latest updates to ensure they work well.
If you still get an error after removing devices, the problem might lie elsewhere. In that case, it’s key to look at other ways to find and fix the issue.
Clear Attribute of $WINDOWS.~BT Installation Folder
If the “Windows 10 installation has failed” message appears, it might be because the installer can’t copy files to a specific folder. You can solve this by changing the settings of the $WINDOWS.~BT installation folder. Here are the steps to possibly fix the error:
Open the File Explorer.
Navigate to the C drive.
Enable the display of hidden items.
Find the $WINDOWS.~BT folder.
Right-click on the folder and access its properties.
Uncheck the Read-Only attribute.
Apply the changes.
Changing the $WINDOWS.~BT folder’s settings might remove obstacles to the installation. Once you’ve done this, attempt the install again to check if the issue is gone.
If problems with the installation persist, explore the following section for more troubleshooting advice.
Steps to Clear Attribute of $WINDOWS.~BT Installation Folder
1. Open the File Explorer.
2. Navigate to the C drive.
3. Enable the display of hidden items.
4. Find the $WINDOWS.~BT folder.
5. Right-click on the folder and access its properties.
6. Uncheck the Read-Only attribute.
7. Apply the changes.
Uninstall Language Pack
Sometimes, the error “Windows 10 installation has failed” happens due to a conflict. This conflict is between the language pack of your old Windows and the new system’s language. To fix this, you might need to uninstall the language pack. The way you uninstall language packs depends on your Windows version.
Windows 10
Navigate to the Language settings by clicking on the language icon in the taskbar or searching for “Language settings” in the taskbar search bar.
In the Language settings, click on “Windows display language”.
Change the Windows display language to English, or any desired language of your preference.
Next, click on “Options” under the language you want to uninstall.
Click on “Remove” to uninstall the language pack.
Windows 7
Access the “Change display languages” option through the Start menu.
In the Region and Language window, click on “Install/uninstall languages”.
Select the non-English language pack you want to uninstall.
Click on “Remove” to uninstall the language pack.
Save the changes and restart your computer.
Uninstalling the language pack might solve the “Windows 10 installation has failed” error. This happens if there were language conflicts.
Make sure to follow these instructions accurately. For more help, check the official Microsoft website.
Rebuild Boot Configuration Data
Errors in the Boot Manager can lead to a ‘Windows 10 installation has failed’ error. You can fix this by rebuilding the Boot Configuration Data (BCD) using Command Prompt.
The process uses specific commands to fix the boot data: bootrec /RebuildBcd, bootrec /fixMbr, and bootrec /fixboot. Accessing Command Prompt is different in Windows 10/8 compared to Windows 7.
How to Rebuild Boot Configuration Data:
On Windows 10/8:
Press the Windows key + X to open the Power User menu.
Select Command Prompt (Admin) to get administrative privileges in Command Prompt.
Type this command:
bootrec /RebuildBcd
Press Enter to run the command and wait until it’s done.
After finishing, restart your system and try the installation again to see if the error is fixed.
On Windows 7:
Insert your Windows 7 installation or system repair disc and restart your computer.
Press any key when asked to boot from the disc.
Choose your language preferences and click Next.
Click ‘Repair your computer’.
In System Recovery Options, go to Command Prompt.
Type these commands, hitting Enter after each one:
Restart your computer and check if the installation error is gone.
Rebuilding the BCD can fix errors that stop Windows 10 from installing. After running the commands and a restart, try installing again to see if the error goes away.
Perform a Clean Boot Installation
Sometimes incompatible software or drivers can stop the Windows installation and cause the “Windows 10 installation has failed” error. You can do a clean boot installation to fix these conflicts. This process involves turning off startup items, services, and non-Microsoft software via the System Configuration tool (msconfig). After turning these off and restarting your PC, you can try installing Windows again. A clean boot can help find and fix any compatibility problems causing the error.
Disabling Startup Items and Services
To do a clean boot installation, you must turn off startup items and services that could disrupt the Windows installation process. Here’s how:
Press Windows + R to open the Run dialog box.
Type msconfig and press Enter to open the System Configuration window.
In the General tab, select the Selective startup option.
Uncheck the box next to Load startup items.
Go to the Services tab.
Check the box next to Hide all Microsoft services.
Click the Disable all button to turn off all non-Microsoft services.
Click the Apply button, then click OK.
Restart your PC to make these changes take effect.
Disabling Non-Microsoft Software
In addition to turning off startup items and services, you should also disable non-Microsoft software that might cause problems during the Windows installation. Here’s how:
Press Ctrl + Shift + Esc to open the Task Manager.
Go to the Startup tab.
Select each listed program and click the Disable button.
Close the Task Manager.
After you’ve done a clean boot installation by disabling startup items, services, and non-Microsoft software, you’re ready to start the Windows 10 setup. Remember, this process may temporarily affect some PC functions. But, it is crucial for fixing the “Windows 10 installation has failed” error.
After completing the Windows installation, you can turn back on the previously disabled startup items, services, and non-Microsoft software. Just use the same steps in the System Configuration tool and Task Manager.
Benefits of Clean Boot Installation
Things to Consider
Identifies and fixes software and driver conflicts.
Raises the chances of a successful Windows installation.
Finds compatibility problems causing the “Windows 10 installation has failed” error.
Temporarily turns off some PC features or functions.
Needs reactivation of startup items, services, and non-Microsoft software after the installation.
May need more troubleshooting if the error continues.
Repair Corrupted System Files
If the “Windows 10 installation has failed” error persists, your system may have corrupted files. Damaged system files needed for installation can cause errors.
The System File Checker tool (sfc /scannow) can scan and repair corrupted system files. It uses the correct files from Windows 10 installation media or Microsoft’s servers to fix the issue.
You could also consider third-party software like Fortect for fixing corrupted files. These programs use advanced technology to find and repair damaged files, helping the Windows 10 setup run smoothly.
Once you’ve scanned and repaired the system files, try installing Windows again to check if the error is fixed. By making sure your system files are intact, you improve your chances of a successful installation.
FAQ
How can I fix the ‘Windows 10 Installation Has Failed’ error during setup?
To fix the installation error, try several methods. These include removing peripherals, clearing the $WINDOWS.~BT folder’s attributes, and uninstalling language packs. You can also rebuild the boot data, do a clean boot, and fix corrupted files.
How do I remove peripheral devices to fix the installation error?
To tackle the error, unplug devices like scanners, printers, and extra monitors. Install without these devices. You can reconnect them after the update is done.
What should I do if the installer repeatedly tries to copy files in a certain folder?
For this issue, clear the $WINDOWS.~BT folder’s attribute. Use File Explorer to find the folder and remove Read-Only status. Then, try reinstalling.
How can I uninstall a language pack to fix the installation error?
On Windows 10, use the Language settings to swap to English and remove other language packs. On Windows 7, do this through the Start menu. This might fix the error.
How do I rebuild the Boot Configuration Data (BCD) to fix the installation error?
Use Command Prompt to enter commands like bootrec /RebuildBcd. Steps vary for different Windows versions. After, restart and see if the issue is fixed.
What is a clean boot installation and how can it fix the installation error?
A clean boot disables certain software using System Configuration. Restart your PC then try installing Windows again. This may solve the error by addressing compatibility issues.
How can I repair corrupted system files to fix the installation error?
Use the System File Checker (sfc /scannow) or Fortect to fix any system file issues. After fixing, retry the installation to check if the problem is solved.
Intel Unison lets you link your tablet or phone with your Windows 10 PC. It makes your devices work together smoothly. By doing a few easy steps, you can use…
Do you get blue screen errors when installing Windows 10? Our guide offers reliable fixes for this issue. It covers the “pantalla azul al instalar windows 10” and stops errors…
Welcome to our guide on installing drivers in Safe Mode on Windows 10. Safe Mode allows you to start your Windows 10 system in a way that can help find…
Many people wonder how long it takes to install Windows 10. The time needed can change due to different factors. We’ll look at these reasons in this article. The installation…
When you’re installing Windows 10 from a USB drive, you might face some problems. These include physical issues with the USB, wrong formats, and EFI/UEFI setup troubles. Other common troubles…
Welcome to our guide on installing Jira in Windows 10. Jira is a powerful tool for project management. It boosts teamwork and makes workflows smooth. This guide will help you…