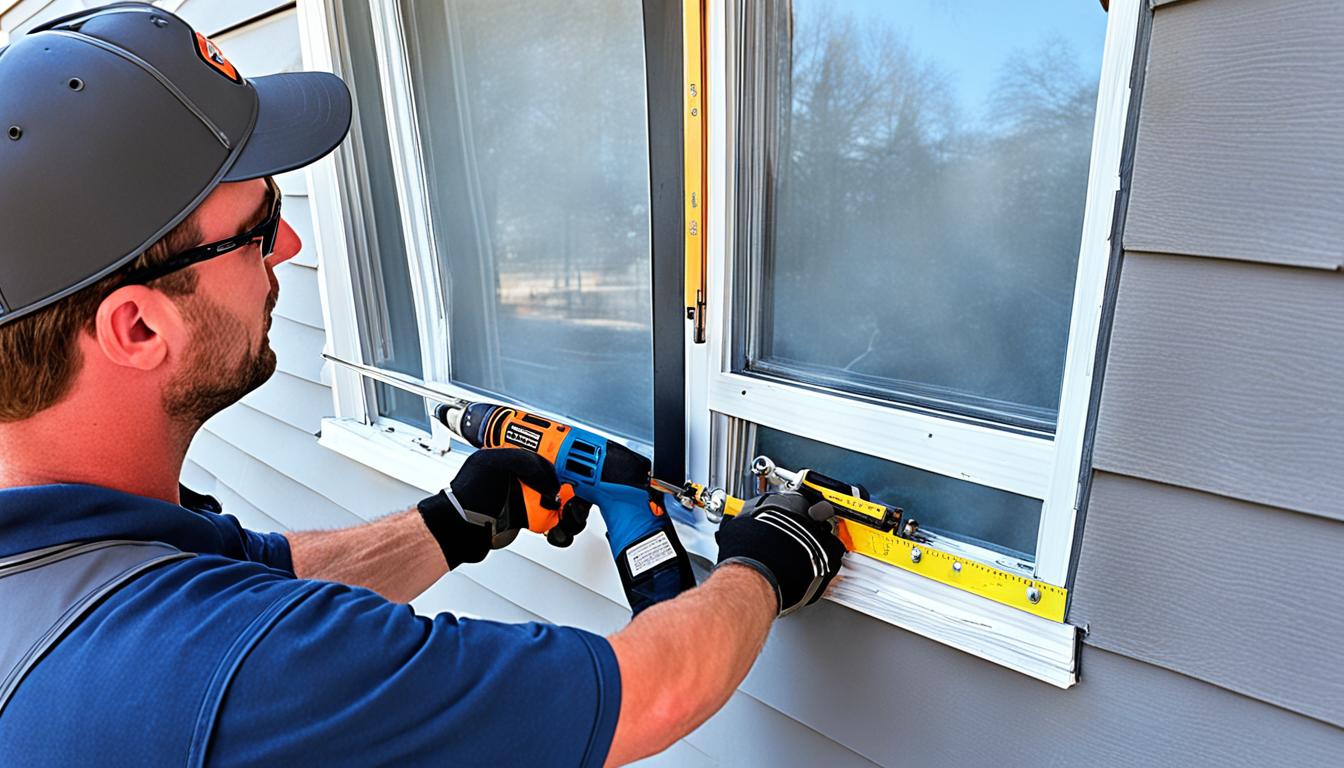
When installing windows with T1-11 siding, consider the method that’s best for you. You can either remove the window’s flange and screw it directly to the studs. Or, keep the flange on and place them over the sheathing board. Both ways have techniques to make your windows look good and keep the weather out.
Removing the flange lets you create a tight seal with peel & stick flashing. This means screwing the window straight to the studs. It ensures a solid and long-lasting fit. If you prefer, keep the flange on. Then, install the windows over the sheathing board. Peel & stick flashing will still keep things sealed.
For a better look, keep the flange on and use peel & stick flashing with 1X trim. Think about what you want and what your project needs to pick the right method.
Looking into all choices and asking experts can lead to great results with T1-11 siding windows. It’s about getting both function and style right. Keep watching this space for more advice on putting windows in with T1-11 siding.
When you’re installing windows with T1-11 siding, there are a few methods you can pick from. Each has its own benefits and points to think about. This makes it easier to find what works best for your project.
Option 1: Removing the Flange
One way is to take off the window’s flange and screw it directly onto the studs. This creates a strong hold and fits well with the T1-11 siding. To keep water out, it’s important to use peel & stick flashing for a good seal. Also, adding 1X material and some trim makes the installation look better.
Another method keeps the window flange on and installs them over a sheathing board. Here, you nail the windows to the frame and use peel & stick flashing for extra protection from the weather. Like the first option, adding 1X material and trim improves how it looks.
Option 3: Leaving the Flange On
If you decide to keep the flange on the windows, you can still make sure the installation is secure and keeps out water. Use peel & stick flashing for better sealing to cut down on water getting in. Putting on 1X trim gives a neat finish and matches the T1-11 siding well.
It’s very important to weigh up the good and bad sides of each method carefully. Think about things like how well it resists the weather, how it looks, and how easy it is to do. Talking to experts and looking at what the manufacturers say can help you pick the best way to install windows with T1-11 siding for your project.
Ensuring Water Infiltration Prevention with T1-11 Siding
It’s vital to stop water getting in when fitting windows with T1-11 siding. Using the right techniques and sealing methods protects your building from moisture harm. Follow these tips for a leak-proof fit with T1-11 siding.
1. Cut T1-11 to Create a Window Cutout
One good approach is fitting windows with a continuous nailing flange against the frame. Cut the T1-11 to make a window space, allowing for a drip cap installation above doors and windows. This drip cap stops water from getting in through the window or door top.
To do this well, measure and cut the T1-11 precisely for the window. Fitting the drip cap right ensures a snug seal. This reduces the chance of water getting behind the siding.
2. Utilize a Half-Depth Saw Cut and Drip Cap
Another technique involves a half-depth saw cut on the T1-11 above the head trim. Place a drip cap in this cut, resting it over the head trim.
This saw cut adds extra protection against water by sealing the gap atop the T1-11 and head trim. It’s particularly effective for T1-11 in a vertical position, stopping water from sneaking behind the trim.
Position the drip cap right and fix it well to the T1-11 for this to work. A proper fit and seal of the drip cap keeps the siding solid.
Consult with Professionals
For T1-11 siding water prevention, it’s smart to talk to experts experienced in siding fitting. They offer tailored advice for your project, helping pick the best techniques and methods.
Stopping water infiltration is key to keeping your T1-11 siding in good shape. With the right steps, like using drip caps and saw cuts, you can shield your building from water damage.
Common Techniques for Window and Door Installation with T1-11 Siding
Installing windows and doors with T1-11 siding involves a few common methods. It’s important to pick the right way that fits your needs. Every approach has its pros and cons.
Method 1: Direct Installation
One method is to attach windows and doors straight onto the T1-11. You then nail trim over them. This is easy to do. But, it might not be the best for keeping out water and air. To improve weatherproofing, think about adding caulk and flashing.
Method 2: Sheathing Layer
Another way is to put a sheathing or WRB layer before the siding. Attach this layer to the studs. Next, install the windows and doors on it. This adds an extra shield against water. But, remember, it could be tricky to remove and place the windows later.
Method 3: T1-11 as Sheathing Layer
You can also use the T1-11 siding itself as a layer. Just add a WRB over the T1-11. Then, put new siding on top. This helps block water. However, make sure to apply proper flashing and caulking for a watertight seal.
Consider the Pros and Cons
It’s key to think about every method’s benefits and downsides. Think about waterproofing, airtightness, and how complex the job will be. Talking to experts or experienced contractors can help. They’ll offer advice on the best method for your project.
Choosing the right method for installing windows and doors with T1-11 siding is vital. Always aim for good weatherproofing and airtightness. This ensures your doors and windows last longer. With careful choice and following best practices, your project can turn out great.
Suggestions and Solutions for T1-11 Siding Installation
Installing T1-11 siding requires understanding its unique aspects. For a successful setup, here are key suggestions and solutions:
Use 10′ high T1-11 sheets: Choose taller sheets to avoid horizontal seams by the eaves. This creates a cleaner, more unified look.
Choose 5/8″ Douglas Fir T1-11: Opt for Douglas Fir over pine. It’s more stable and resists warping and cracking better.
Installation methods for windows and doors: Explore different approaches to installing windows and doors. Whether removing the flange or not, ensure you properly flash, seal, and trim to stop water getting in.
Seeking advice from professionals can be a big help. They provide insights and expertise for a successful, long-lasting T1-11 siding installation.
Conclusion
Installing windows with T1-11 siding means thinking about various methods. You must weigh the good and bad points of each way. For example, choosing whether to keep or remove the flange on the windows. It’s also vital to stop water from getting in.
Using drip caps and saw cuts are ways to prevent water damage. By knowing how to install windows and doors with T1-11 siding, you can make wise choices for your project.
It’s crucial to talk to experts when dealing with T1-11 siding. They know the tricks and solutions for installing this type of siding. Their advice can help you make sure your project is weatherproof and done right.
Don’t forget to consider what your project specifically needs. Each project is different. What works well for one might not suit another. Spend time learning the best methods for your situation. This effort will lead to a stunning and tough finish for your home.
FAQ
What are the options for installing windows with T1-11 siding?
You can remove the window’s flange, then screw it directly to the studs. This creates a weatherproof seal with peel & stick flashing. Alternatively, keep the flange on the windows. Install them over the sheathing board, nailing to the frame. Use peel & stick flashing for extra sealing. Another choice is to keep the flange and use both peel & stick flashing and 1X trim. This enhances the look.
How can water infiltration with T1-11 siding be prevented?
To stop water from getting in, install windows with a continuous nailing flange against the frame. Then, cut the T1-11 to fit the window. This lets you add a drip cap above doors and windows to block water. Also, try a half-depth saw cut in the T1-11 above the trim. Put a drip cap in the saw cut and over the trim. This keeps water out from behind the trim.
What are some common techniques for window and door installation with T1-11 siding?
One way is direct installation onto the T1-11, nailing the trim on top. Another method is to put a sheathing/WRB layer first, then the T1-11, followed by windows and doors to the WRB/studs. Some also use the existing T1-11 as a sheathing layer. They then add a WRB over it and install new siding.
What are some suggestions and solutions for T1-11 siding installation?
Using 10′ high T1-11 sheets helps avoid horizontal seams on eave sides. Choose 5/8″ Douglas Fir T1-11 for more stability than pine. It’s important to ensure proper flashing, sealing, and trim installation. This is key when installing windows and doors with T1-11 siding to keep water out.
If you own a Mac and wish to create a Windows 11 installation media, several methods exist. WonderISO is highly recommended for its ease and effectiveness. It helps create Windows…
To install network adapter drivers on Windows 11 without internet, there are several techniques. They help you get through the Windows 11 setup without needing an internet. This allows you…
When trying to install NVIDIA drivers on Windows 11, you might see a “NVIDIA Installer failed” error. This stops you from installing the needed drivers for your NVIDIA Graphics GPU….
Welcome to our guide on installing Proxmox on Windows 11. If you aim to improve server management through virtualization, you’ve found the right tutorial. We will guide you through the…
Trying to install or upgrade to Windows 11 might bring up some errors. But don’t worry. Many errors can be fixed with a few simple steps. First, let’s look at…
Dual booting lets you enjoy Windows and Linux on one computer. This guide shows you how to install Windows 11 on Kali Linux. You’ll get a great dual boot setup….