Securing your Windows 10 system is crucial, and a digital certificate is key. This certificate ensures safe communication between your browser and websites. It keeps your info safe and fends off security risks. Let us guide you through installing a digital certificate on Windows 10 to make browsing safer.
This security guide will show you how to install a digital certificate step by step. By following these instructions, you can protect your system against cyber threats. You’ll gain the confidence to install a digital certificate and boost your system’s safety.
For your Windows 10 system’s safety, understanding the value of a trusted root certificate is essential. It makes your system trust the certificate’s source. This is crucial whether you use a private or public certificate authority. Trust leads to secure browsing.
Adding a trusted root certificate is key to stronger security. It gives you control over managing and looking at certificates, enhancing your online protection.
We will walk you through installing a trusted root certificate on Windows 10. The steps will include downloading the certificate, using the import wizard, and configuring authorities. These instructions are clear and easy to follow for hassle-free installation.
We’ll also explore the Microsoft Management Console (MMC) and its role in managing certificates. With MMC, you can get a full view of your installed certificates, especially those from Trusted Root Certification Authorities.
By the end of this guide, you’ll have installed a digital certificate on your Windows 10, improving your online security. It’s crucial to keep your trusted root certificates updated for the best protection.
Start improving your system’s security today by installing a digital certificate on Windows 10. This will upgrade your browsing experience, ensuring safety and peace of mind.
Installing a trusted root certificate is key for your Windows 10 system’s security. When a machine does not trust the certificate of authority, installing a trusted root becomes necessary. This is especially true when dealing with private or custom certificate servers rather than public ones. Such an installation makes your system recognize and trust the certificate, making your web experience safer.
The Importance of a Trusted Root Certificate
Trusted root certificates are vital for a secure browser-to-website connection. By installing one, your system can check if a website is real and safe. This means your chats with the website are private and secure.
Choosing a private or custom certificate server means it might not be widely trusted. This can lead to warnings or alerts when visiting certain websites. To solve this, installing a trusted root certificate is crucial. It makes your certificates widely accepted and trusted.
This ensures your browsing is more secure. It helps keep your personal data, like login details and bank information, safe from threats.
While private servers allow more control, it’s important to install trusted root certificates correctly. Doing so keeps your security standards high.
Example Table: Comparing Trusted Root Certificates
Aspect
Private or Custom Certificate Server
Public Certificate of Authority
Source
Internal organization or custom provider
Established public certificate authority
Recognition
May require additional steps for system-wide trust
Widely recognized and trusted by default
Flexibility
Allows customization and control over certificates
Standardized certificates with limited customization
Cost
Potentially lower or custom pricing options
Typically involves a fee or subscription
Security
Dependent on proper installation and management of trusted root certificates
Backed by the reputation and security measures of the public certificate authority
By installing trusted root certificates from your server, you ensure your certificates are trusted. This makes devices that interact with your server safe. It creates a secure browsing space for everyone involved.
How to Install a Trusted Root Certificate on Windows 10
Adding a trusted root certificate to your Windows 10 system is key for security. This guide shows you how to do it in a few steps. It will make your online experience safer.
Step 1: Download the CA Certificate
Start by getting the CA certificate from a reliable source. This certificate is from a certificate authority. It helps your system trust websites and applications.
Step 2: Open the Certificate Import Wizard
With the CA certificate ready, open the Certificate Import Wizard next. It’s a feature in Windows 10 for adding and managing certificates.
Pro Tip: Press the Windows key + R to launch the Run box. Type certmgr.msc and hit Enter to start the wizard.
Step 3: Import the Trusted Root Certificate
Use the Certificate Import Wizard to add the trusted root certificate:
Pick “Local Machine” for the certificate store.
Select “Place all certificates in the following store”. Then choose “Trusted Root Certification Authorities”.
Hit “Next” to go on.
Press “Browse” to find the downloaded CA certificate.
Choose the CA certificate and hit “Next”.
Check the certificate details and click “Finish” to finish importing.
Step 4: Verify the Certificate Installation
It’s vital to ensure the trusted root certificate is properly installed. Check the list of trusted roots in your system to be sure.
Pro Tip: Press the Windows key + R, type mmc, and hit Enter to open MMC. Add the Certificate Snap-in and pick the Trusted Root Certification Authorities store to see your certificates.
By following these simple steps, you can install a trusted root certificate on your Windows 10. It helps your system trust the certificate authority, making your browsing secure.
Adding Certificate Snap-ins with Microsoft Management Console (MMC)
The Microsoft Management Console (MMC) is a tool that lets you manage and view certificates on Windows 10. It helps you easily handle and view the certificates. This includes certificates from the Trusted Root Certification Authorities.
To add certificate snap-ins with MMC, just follow these easy steps:
Press the Windows key + R to open the Run dialog box.
Type “mmc” and hit Enter to open the Microsoft Management Console.
In the MMC window, click on “File” at the top and select “Add/Remove Snap-in.”
In the next window, pick “Certificates” and then click “Add.”
Choose “Computer Account” and click on “Next.”
Select “Local Computer” and click “Finish.”
Click on “OK” to close the window.
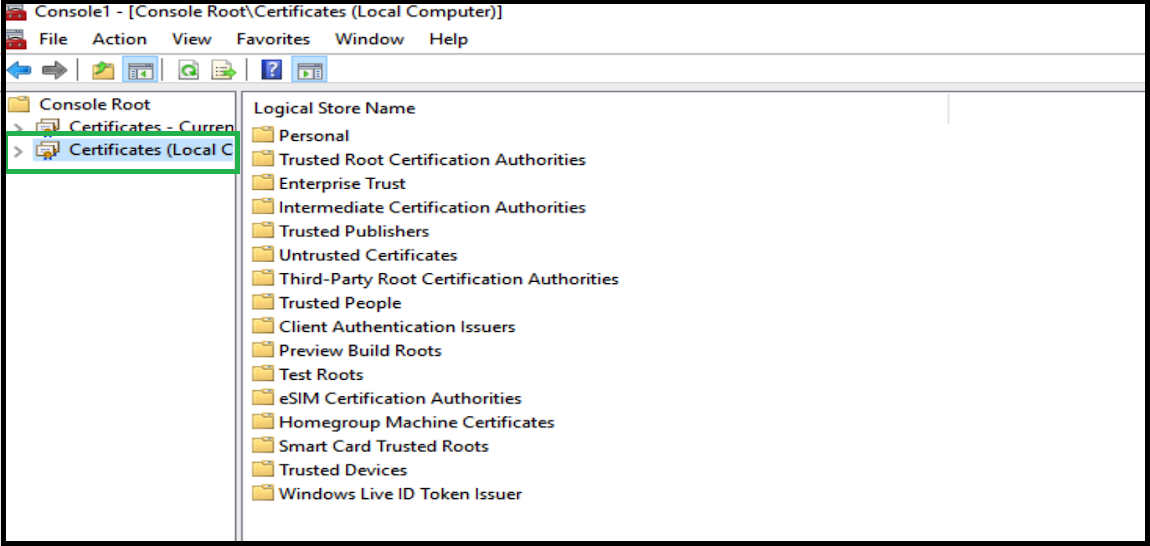
In the MMC window, look for “Certificates (Local Computer)” and expand it.
Go to “Trusted Root Certification Authorities” and expand it too.
You’ll see a list of trusted root certification authorities on your system now.
This way, you can effortlessly add certificate snap-ins with Microsoft Management Console (MMC). It gives you total control and a clear view of your Windows 10 system’s certificates.
Image: Adding Certificate Snap-ins with Microsoft Management Console (MMC)
Conclusion
By following this guide, you’ve now set up the digital certificate on your Windows 10. This step boosts your browsing security. It makes sure your system knows and trusts the certificate of authority. Now, you can surf the web safely, shielded from security risks.
For top security, it’s important to regularly update your system. You should add trusted root certificates. This action ensures your Windows 10 stays in tune with legit certificates. It boosts your online safety. By doing this, you enjoy the digital world without worries.
Installing a digital certificate is key for a secure Windows 10 browsing. By applying what we’ve covered, you’ve made your online space safer. Stay alert and update your system often. Focus on digital security to protect your important info in this digital age.
FAQ
Why is it important to install a digital certificate on Windows 10?
A digital certificate helps your browser check if a website’s communication is secure. This boosts your system’s security.
When is it necessary to install a trusted root certificate?
Install a trusted root certificate when you use a private certificate server. This makes your system trust the certificate, making browsing safer.
How can I install a trusted root certificate on Windows 10?
To install a certificate on Windows 10, first download the CA certificate. Then use the Certificate Import Wizard to add it to your system’s trusted list.
How can I add certificate snap-ins with Microsoft Management Console (MMC)?
To add certificate snap-ins with MMC, follow these steps:
Open the Run dialog by pressing the Windows key + R.
Type “mmc” and press Enter.
In the MMC, go to “File” and select “Add/Remove Snap-in”.
In the “Add or Remove Snap-ins” dialog, select “Certificates” and click “Add”.
Choose “Computer account” and click “Next”.
Select “Local computer” and click “Finish”.
Click “OK” to add the certificate snap-in with MMC.
How does installing a digital certificate enhance my system’s security?
Installing a digital certificate means your system trusts certain authorities. This trust improves your browsing security and keeps you safe from threats.
How can I stay safe online and keep my system updated with trusted root certificates?
To stay safe online, regularly update your system with trusted root certificates. This keeps your security tight against threats.
Are you a PHP developer wanting to set up a local space for development on Windows 10? Look no further than WAMP server! It’s a free tool that combines Windows,…
To install macOS Ventura on VirtualBox running on Windows 10, follow our easy guide. This guide will show you each step needed for a smooth installation. Whether you’re doing a…
Welcome to our guide on setting up a Seagate external hard drive on Windows 10. This will help if you need more space or want to back up files. Installing…
Installing Windows 10 on a new hard drive is simple and necessary. It helps move smoothly to the newest operating system. This guide is for those who have either bought…
Installing Visual Basic 6 on Windows 10 might seem tough, especially if you use old apps. Many are looking for ways to get VB6 running on their modern computers. They…
Welcome to our guide on installing Jira in Windows 10. Jira is a powerful tool for project management. It boosts teamwork and makes workflows smooth. This guide will help you…