Are you a PHP developer wanting to set up a local space for development on Windows 10? Look no further than WAMP server! It’s a free tool that combines Windows, Apache, MySQL, and PHP. It has everything for you to begin. We will guide you through each step to install WAMP server on Windows 10. This will make your development work much smoother.
Before you set up WAMP server, make sure you have what’s needed. Your Windows 10 system must have Microsoft Visual C++ Redistributable packages installed. These include versions from 2008 to 2017. They’re key for WAMP server to work right.
If these are missing, WAMP server might not install or work well. So, getting the Microsoft Visual C++ Redistributable packages is a must before starting with WAMP.
Tip: To see if you’re ready, go to the Microsoft website. Look up “Microsoft Visual C++ Redistributable” for the download page. It shows which versions you have.
Why are the Microsoft Visual C++ Redistributable Packages Required?
The Microsoft Visual C++ Redistributable packages are essential. They have runtime components and libraries needed by apps made with Visual C++. WAMP server needs these to work well with Windows.
Installing these packages boosts WAMP server by using Visual C++ features. It makes your local development setup more stable and powerful.
Installing the Microsoft Visual C++ Redistributable Packages
To add the Microsoft Visual C++ Redistributable packages, just follow these steps:
Go to the official Microsoft website or search “Microsoft Visual C++ Redistributable download”.
Find the download page for the version you need.
Pick the right architecture (x86 or x64) for your system.
Hit “Download” to start getting the file.
Once downloaded, open the installer and do what it says to install.
Do this for every Microsoft Visual C++ Redistributable package needed by WAMP.
After getting the Microsoft Visual C++ Redistributable packages, you’re ready. Your system meets the requirements for WAMP server installation on Windows 10.
With everything set, you can move on to installing WAMP server. We’ll go over this in the next part.
Installation Process of WAMP Server
To install the WAMP server on Windows 10, just follow this easy guide:
Go to the Wamp Server website and grab the 64-bit version.
Click on the file you downloaded to start installing.
Pick the language you like and agree to the terms.
Choose where you want WAMP server to live on your computer.
Decide which parts of the server you need.
Pick a spot in the start menu for WAMP server.
Have a quick look at your choices, then click “Install” to get going.
Choose your go-to browser and text editor.
Hit “Finish” and you’re all done.
After you’ve finished, the WAMP server will be ready on your Windows 10. Next, you can set it up how you like for the best performance.
Step Number
Step Description
1
Visit the Wamp Server website and download the 64-bit version of WAMP server.
2
Double-click the downloaded file to launch the WAMP installer.
3
Select your preferred language and accept the license agreement.
4
Choose a location to install the WAMP server.
5
Select the components you want to install.
6
Select the start menu folder.
7
Review the installation details and click “Install” to begin the installation.
8
Select your default browser and text editor.
9
Click “Finish” to complete the installation.
Configuration Process of WAMP Server
After you install the WAMP server, it’s time to set it up for the best performance. Here are the steps to follow for a smooth setup:
Start the WAMP server: Look for the shortcut on your desktop. Double-click it to open the WAMP server.
Wait for the server to turn green: Watch the taskbar icon when the server runs. It turns green to show everything is working right.
Fixing Apache issues: If there are Apache problems, you can choose from two solutions:
Changing the default port of Apache: Access the WAMP server menu and go to Apache Module Service. Hit the “httpd.Conf” button, find “Listen 80”. Change “80” to another port like 81 or 9080. Save your changes and restart WAMP.
Disabling Internet Information Services (IIS): Visit your computer’s Control Panel, hit “Programs”, then “Turn Windows Features On or Off”. Unselect “Internet Information Services”, click “OK”, and reboot your computer.
Verify functionality: Check that the WAMP server is set up correctly. Open the WAMP menu and test the localhost and phpmyadmin funcs.
Common Issues and Troubleshooting
Run into problems while setting up? Here are some tips to fix them:
Check installed components: Make sure everything needed for WAMP is installed right on Windows 10.
Verify port accessibility: Check that the ports WAMP needs aren’t blocked by other apps or firewall.
Review configuration settings: Go over the WAMP settings again to make sure they’re all correct.
Restart and check logs: Restart WAMP and look at the logs for errors or warnings that might help.
Seek online assistance: If you’re still stuck, look for help on forums or the WAMP community. Many have been through similar issues and can advise.
Issue
Potential Solution
Apache not working
Change the default port or disable Internet Information Services (IIS)
Access denied to localhost or phpmyadmin
Check file and folder permissions, ensure proper configuration
MySQL service not running
Restart WAMP server, check MySQL logs for errors
Unknown database error
Verify database connection settings, ensure database existence
Troubleshooting WAMP Server Issues
If you face problems with the WAMP server, like Apache or MySQL services not starting, follow these steps:
Check if the required components are installed correctly.
Make sure the necessary ports are not blocked by other applications.
Verify the configuration settings in the WAMP server.
Restart the WAMP server and check for error messages in the logs.
Seek assistance from online forums or the WAMP server community for specific issues.
There are many reasons why your WAMP server might not work right. Troubleshooting is key to finding and fixing these issues. Below are some common ways to solve problems with the WAMP server on Windows 10.
Check that you’ve installed all needed parts for the WAMP server. Ensure Apache, MySQL, and PHP are correctly installed and running smoothly.
Port blocking by other apps is a usual problem. If your system’s other applications use the same ports as the WAMP server, this can cause issues. To fix this, check the port list used by the WAMP server. Make sure they are free from other uses.
Confirm your WAMP server’s configuration settings. Make sure all paths and settings for Apache, MySQL, and PHP are correct. Wrong settings can mess up your server’s working.
Restarting the WAMP server can often fix some errors. After restarting, look at the server’s logs. They might have error messages or warnings that tell you what’s wrong.
If fixing the problems yourself is tough, get help from online forums or the WAMP server community. Lots of online groups and communities are there to help. Just ask your questions and look for advice from those with more experience.
Follow these troubleshooting steps to tackle various issues and keep your WAMP server running smoothly on Windows 10.
Conclusion
Following this guide lets you easily install and set up the WAMP server on Windows 10. This server is perfect for local development. It supports PHP and other CMS platforms. With it, you can work on your web projects without worrying about live sites.
For web developers, having a local development space is key. It lets you test and fix your code before it goes live. The WAMP server gives you everything you need on your Windows 10 PC. That includes Apache, MySQL, and PHP.
With the WAMP server, creating and testing websites becomes easy. You can use WordPress, Joomla, or Drupal. Play around with different designs, plugins, and tweaks. This can all be done without risking your live site. It’s great for both newbies learning PHP and pros building complex sites. The WAMP server makes local development on Windows 10 simple and reliable.
FAQ
What is WAMP server?
WAMP server helps PHP developers work on Windows 10. It includes Windows, Apache, MySQL, and PHP. It also comes with tools like phpmyadmin.
How do I install WAMP server on Windows 10?
To get WAMP server on Windows 10, you need to follow some steps.
What are the prerequisites for installing WAMP server?
Before installing WAMP server, check if you have Microsoft Visual C++ Redistributable packages. They are vital for WAMP server to work. These packages cover versions from 2008 to 2017.
How do I configure WAMP server after installing it?
Once WAMP server is installed, you need to set it up properly. Just follow these steps:
What can I do if I encounter issues with the WAMP server?
Facing issues with WAMP server? If Apache or MySQL don’t work, here are some steps to help troubleshoot:
What are the benefits of using WAMP server for local development?
Using WAMP server makes website testing and development easier. It is perfect for working with PHP and CMS offline. This way, you can streamline your workflow.
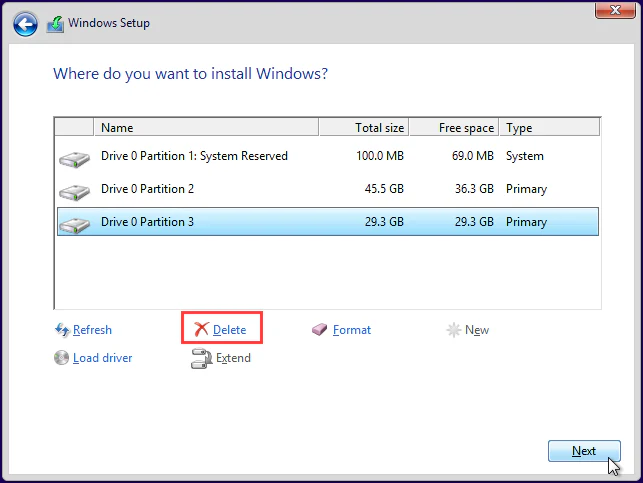
Welcome to our guide on installing Windows 10 on a new hard drive. This guide is perfect whether you’re building a new PC or upgrading an old one. We’ll show…
Solid State Drives (SSDs) are modern storage gadgets. They use flash memory to keep data. This makes them faster than old HDDs. When Windows 10 comes already installed on an…
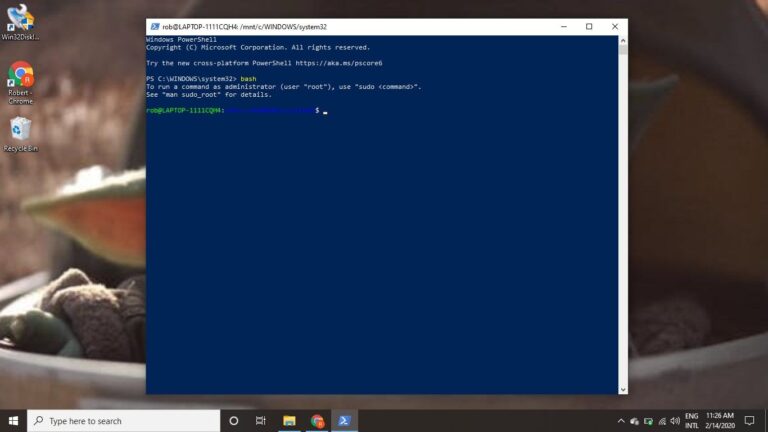
Welcome to our guide on installing Bash on Windows 10. We’ll show you how to enable Developer Mode, install a Linux distro, and access the Bash shell. This allows you…
Many users set up Windows 10 without a Microsoft account to protect their privacy. This guide will help you install Windows 10 without a Microsoft account. It gives you more…
Installing Visual Basic 6 on Windows 10 might seem tough, especially if you use old apps. Many are looking for ways to get VB6 running on their modern computers. They…
Sometimes, installing Windows 10 from a USB drive can hit snags. This article will show you how to fix problems when Windows 10 won’t install from a USB. We’ll cover…