Welcome to our guide on installing SSL certificates in Windows 10 for better security. In today’s world, keeping sensitive information safe is crucial. SSL certificates help secure communications effectively. By following this article, you can improve your Windows 10 security and protect your important data.
Before starting the installation, let’s look at the importance of SSL certificates in digital security. SSL stands for Secure Sockets Layer. It creates a secure connection between a web server and a browser. This secure link keeps sensitive data safe from threats during transmission.
To start installing, first generate a Certificate Signing Request (CSR). Then, submit it for checking and approval. The CSR is a request for your SSL certificate. It contains key details about your business and domain.
After getting your CSR approved by a trusted authority like SSL.com, you can begin the actual installation. This step involves downloading the SSL certificate from your SSL.com account. Then, you set it up in the Internet Information Services (IIS) Manager on your Windows 10 computer.
Installing the SSL certificate on your Windows 10 enhances security and website trust. It reassures your visitors that their data is safe. This boosts trust in your online space. So, let’s work on securing your Windows 10 system’s digital safety.
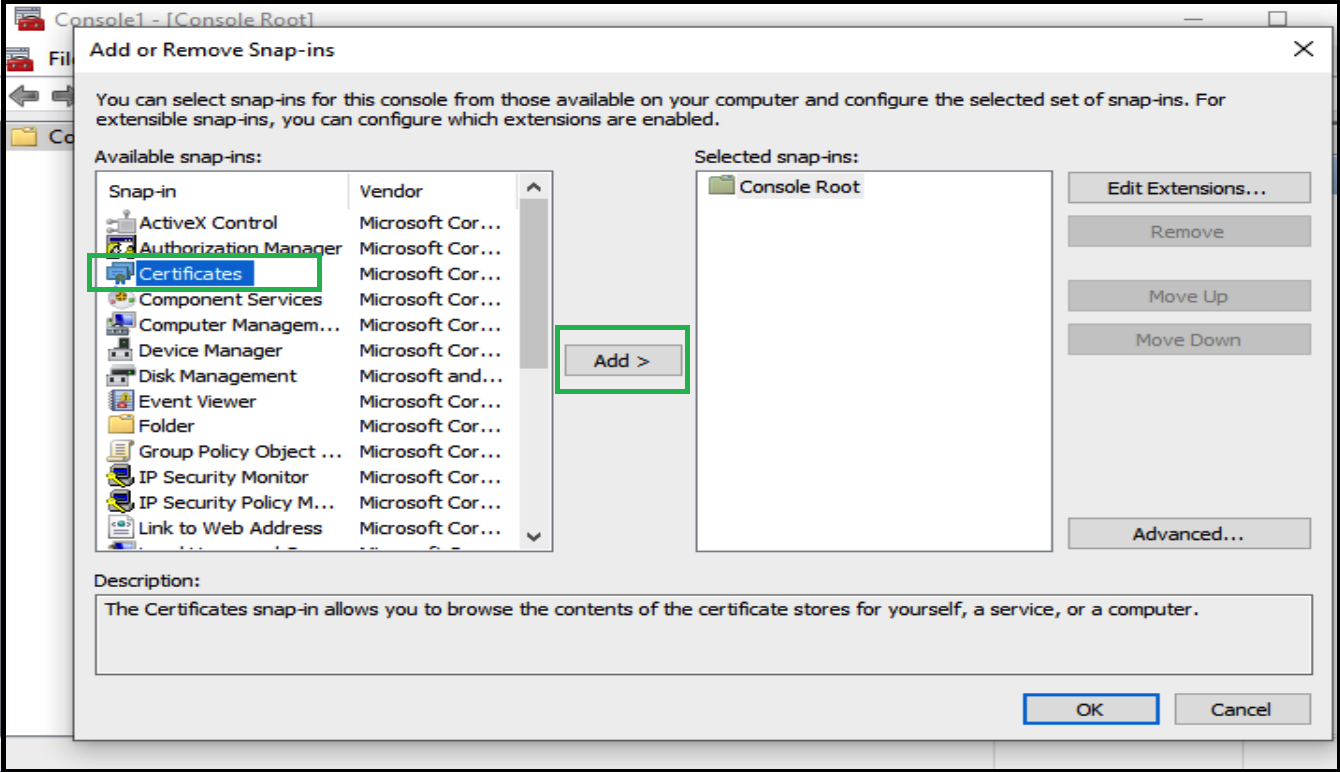
Open IIS Manager and click on the server in the Connections section.
Then, double-click the Server Certificates icon.
Click “Create Certificate Request…” in the Actions section.
Enter the needed details, including the common name (your domain name).
Select the cryptographic service provider and the key bit length.
Finally, save the CSR file in a safe place.
This certificate signing request (CSR) is what you’ll use to get your SSL certificate from the certificate authority.
Why Generating a Certificate Signing Request (CSR) is Important
Creating a certificate signing request (CSR) is key for getting an SSL certificate. The CSR holds details needed by the certificate authority. It confirms that the certificate matches the right domain and company. This boosts your site or app’s security.
By doing these steps, generating a certificate signing request (CSR) in Windows 10 is straightforward. It’s a big step towards installing your SSL certificate.
Submitting the CSR for Validation and Signing
After creating the Certificate Signing Request (CSR), you must send it to a reliable Certificate Authority (CA) for checks and signing. Opting for a well-known CA, like SSL.com, ensures a secure and credible SSL certificate validation. To submit the CSR, you might fill in an online form or email the CSR file.
The CA checks if you really own or control the domain you want the SSL certificate for. They do a series of checks to make sure the certificate fits your domain’s security needs. And that it properly represents your organization.
“The certificate authority will thoroughly review your CSR and perform the necessary validation checks to ensure the authenticity and legitimacy of your request. This stringent validation process ensures that only trustworthy entities receive SSL certificates.”
To confirm your control over the domain, the CA may inspect email addresses linked to the domain or look into public databases. This detailed process makes sure your SSL certificate is authentic and dependable.
After verifying your domain’s ownership or control, the CA will sign the SSL certificate. They will then give you all you need to complete the installation.
Picking a respected certificate authority that adheres to standard SSL signing practices is important. It guarantees that your SSL certificate gets global recognition and trust from web browsers and users.
Benefits of SSL Certificate Validation and Signing
Benefits
Description
Enhanced Trust and Security
SSL certificate validation builds trust among users and ensures secure communication between the browser and the server.
Confidence from Visitors
A validated SSL certificate displays trust indicators, such as the padlock icon and the “https” prefix, instilling confidence in visitors.
Protection against Phishing Attacks
SSL certificate validation protects against phishing attacks, as it verifies the authenticity of the domain and ensures user data encryption.
Compliance with Industry Standards
Validation and signing of SSL certificates ensure compliance with industry requirements and regulations, including data protection and privacy laws.
Improved SEO Ranking
Websites with valid SSL certificates enjoy higher rankings in search engine results, as SSL is a ranking signal for search engines like Google.
Downloading and Installing the SSL Certificate in Windows 10
After your SSL certificate gets validated and signed, it’s time to put it on your Windows 10. Just follow these simple steps to get it done.
Step 1: Downloading the SSL Certificate
To get your SSL certificate, head over to the certificate provider’s site and log into your account. Find your certificate under your orders and hit the download button. Make sure you pick the right file format for Windows IIS, like Microsoft IIS (*.p7b).
Step 2: Installing the SSL Certificate
Got your certificate? Great! Now, open IIS Manager on your Windows 10. Look for your server in the Connections area and double-click on Server Certificates. Then, click on “Complete Certificate Request…” in the Actions area.
In the window that comes up, find and select your downloaded certificate file. Give the certificate a name that’s easy to remember, like your website’s domain. Hit OK and you’re almost there.
After installing, don’t forget to link your SSL certificate to your site, port, or IP address. This step is crucial for it to work properly.
Summary:
So, setting up your SSL certificate on Windows 10 needs two main actions. Download it from your certificate authority’s site, choosing the right file format for Windows IIS. Then, use IIS Manager to add the certificate to your system. Ensure to connect the certificate to your site, port, or IP to get it up and running. Follow these instructions, and your website will be more secure for everyone visiting.
Steps
Description
Step 1
Download the SSL certificate from your certificate authority account.
Step 2
Open IIS Manager on Windows 10, select the server, and complete the certificate request using the downloaded certificate file.
Conclusion
Adding an SSL certificate to Windows 10 is key for better security. This guide helps you create a certificate request and download a signed certificate for Windows IIS. Make sure to link the certificate with a website, port, or IP address.
With an SSL certificate, your Windows 10 system’s communications are secure. This encryption protects your data from threats. Always keep your SSL certificates up-to-date for the best security.
Become proactive in your digital security by installing SSL certificates the right way. This builds trust with users, boosts your search rank, and keeps information safe. Secure your Windows 10 system with an SSL certificate now.
FAQ
How do I install an SSL certificate in Windows 10 for enhanced security?
To install an SSL certificate in Windows 10, start by generating a certificate signing request (CSR). Then, submit it for validation and signing. After that, download the certificate and install it in Windows IIS. Finally, make sure you bind the certificate to your website, port, or IP address.
How do I generate a Certificate Signing Request (CSR) in Windows 10?
Start with opening IIS Manager in Windows 10. In the Connections pane, select your server. Then, double-click the Server Certificates icon and click “Create Certificate Request…” in the Actions pane. You’ll need to fill in some information, like the domain name, and choose your cryptographic service provider. Remember to save the CSR file safely.
How do I submit the CSR for validation and signing?
First, pick a trusted certificate authority like SSL.com and follow their process for submitting your CSR. This might involve an online form or emailing the CSR file. The authority will check to make sure you own the domain. After checking, they’ll sign the certificate and give you the files needed for installation.
How do I download and install the SSL certificate in Windows 10?
Once your SSL certificate is validated and signed, download it from your account on the certificate authority’s site. Look for your certificate order and pick the right file format for Windows IIS. In Windows 10’s IIS Manager, select your server and double-click Server Certificates. Click “Complete Certificate Request…” in the Actions pane. Find the certificate file, give it a friendly name, and complete the setup.
Why is installing an SSL certificate in Windows 10 important?
Installing an SSL certificate on Windows 10 boosts your security. It secures communication and keeps sensitive information safe. By installing it correctly, you protect your system and enhance your digital security.
Welcome to our guide on setting up Windows 10 on Hyper-V. If you want to test software, build a development space, or try new features, Hyper-V is ideal. We’ll show…
Python is a versatile programming language beloved by beginners and experts. It excels in areas like scripting, automation, and data analysis, including machine learning and back-end development. This guide will…
Lab 12-1 offers a hands-on learning experience for installing Windows 10. It has step-by-step instructions. This makes setting up Windows 10 easy and understandable. Whether you’re new or experienced, you’ll…
If you want to install Windows 10 on Linux Mint without USB, you’re in the right place. This guide will show you how to have both operating systems on your…
Learn how to install and enable Telnet on Windows 10 for remote access and fixing network problems easily. Use the command prompt or GUI. Telnet is an important network protocol….
Windows 10 users might face a problem where the update to version 22H2 installs over and over. This repeated installation can mess up how your computer works and cause loss…