Want to make your website safer? Installing an SSL certificate is key. It encrypts data travelling between users and your site. This guide will show you how to set up an SSL certificate on Windows 10. Your online space will be secure.
Securing your site is vital, whether you have an e-commerce store, gather user data, or run an interactive blog. An SSL certificate on Windows 10 boosts your site’s trustworthiness and search rankings. Our tips make installing one straightforward, ensuring your users’ safety.
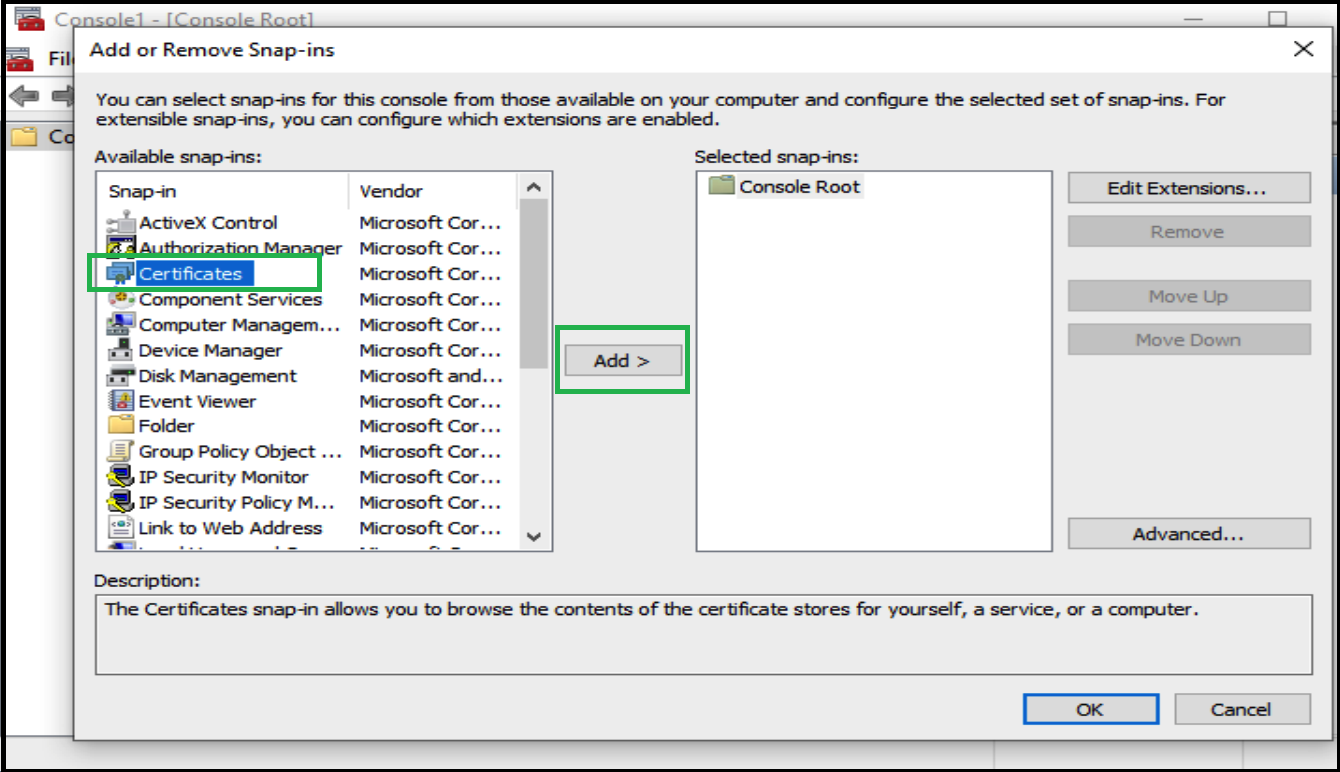
We’ll start with generating a Certificate Signing Request (CSR) in IIS 10. The CSR is essential for getting your SSL certificate. It verifies your identity with the certificate authority. See Section 2, Generating a Certificate Signing Request (CSR) in IIS 10, for how to do this.
After you get the CSR, you need to download and install the SSL certificate. Section 3, Downloading and Installing the SSL Certificate, walks you through this. It ensures a smooth installation on your Windows 10 system.
Generating a Certificate Signing Request (CSR) in IIS 10
Securing your website starts with generating a Certificate Signing Request (CSR) in IIS 10. This file includes your website’s public key. It’s needed to request an SSL certificate from a Certificate Authority (CA).
Click on “Create Certificate Request” in the Actions pane.
Fill in the “Distinguished Name Properties” window. Include details like the Common Name (CN), Organization, and more.
Pick a strong cryptographic service provider and bit length for the key pair.
Choose where to save the CSR and name the file.
Click “Finish” to create the CSR.
After creating the CSR, you can send it to a trusted CA. They’ll check the CSR and give you an SSL certificate for your site. This certificate will help you install it on your server.
Crafting a CSR in IIS 10 is key to making your site secure. It helps you get an SSL certificate. This encrypts the connection between your server and visitors. It keeps sensitive info safe and private.
Key Steps
Benefits
Step 1: Open IIS Manager
Easy access to the server configuration
Step 2: Select the server name
Efficient management of multiple servers
Step 3: Double-click on “Server Certificates”
Quick navigation to certificate management
Step 4: Click on “Create Certificate Request”
Streamlined CSR generation process
Step 5: Enter required information
Accurate representation of website details
Step 6: Choose cryptographic settings
Enhanced security through strong encryption
Step 7: Specify file name and location
Organized storage of generated CSR
Step 8: Click on “Finish”
Successful generation of CSR
Downloading and Installing the SSL Certificate
After creating a Certificate Signing Request (CSR) in IIS 10, the next step is downloading and installing the SSL certificate. This will make your website’s connection secure and encrypted.
Log in to your SSL certificate provider’s website and navigate to the certificate management section.
Locate the SSL certificate for your domain and click on the download button. Save the certificate to a secure spot on your computer.
Open the Windows 10 Start menu and search for “Manage computer certificates.” Click on it to open.
In the left pane, expand the “Personal” folder, right-click on “Certificates,” and pick “All Tasks” > “Import.”
The Certificate Import Wizard will open. Click “Next” to go on.
Press the “Browse” button and find where you saved the certificate. Select it and click “Open.”
Make sure the path of the certificate is correct in the “File name” field. Click “Next” to go on.
Pick where to put the certificates. Choose “Personal” and click “Browse.”
In the Select Certificate Store window, pick “Personal” and click “OK.” Click “Next” to go forward.
Check the details and click “Finish” to wrap up.
When the SSL certificate is in place, you can link it to your website in IIS 10. This links the certificate to the correct web tool and starts secure connections.
Example of a Certificate Import Wizard
Step
Description
Step 1
Log in to your SSL certificate provider’s website and find the SSL certificate for your domain. Download the certificate to your computer.
Step 2
Use the Windows 10 Start menu to search for “Manage computer certificates.” Open it by clicking on the app.
Step 3
Expand “Personal” in the navigation and right-click on “Certificates.” Choose “All Tasks” > “Import” to start the process.
Step 4
Proceed by clicking “Next.”
Step 5
Use the “Browse” button to find the certificate you saved. Select it and click “Open.”
Step 6
Check the path in the “File name” field is right. Click “Next” to continue.
Step 7
Select where to store the certificates. Choose “Personal” and hit “Browse.”
Step 8
In the Select Certificate Store window, choose “Personal” and click “OK.” Go to the next step.
Step 9
Review everything and click “Finish” to end the installation.
By completing these steps and installing the SSL certificate, you’re ensuring your website’s connections are safe.
Binding the SSL Certificate to a Website in IIS 10
After you’ve installed the SSL certificate on Windows 10, your next move is to connect it with your site in IIS 10. This process makes sure your site uses secure links. It builds trust with your users.
Step 1: Open Internet Information Services (IIS) Manager
To start, you need to open the IIS Manager on your Windows 10 system. Just search for “IIS Manager” in the start menu and click the result you find.
Step 2: Select the Website
Look for the “Sites” section in the IIS Manager. Select the website you wish to work on. Right-click it and pick “Edit Bindings” from the menu that appears.
Step 3: Add a New Binding
In the window that says “Site Bindings”, hit the “Add” button. You’re setting up a new connection for your SSL. Pick “https” as your connection type. Then, select the right IP address and port number, which is usually 443.
Step 4: Select the SSL Certificate
Look for the “SSL certificate” dropdown box. Choose the SSL certificate you installed earlier. This box will show all SSLs installed on your Windows 10 device. Select the one for your website and click “OK”.
Step 5: Save the Changes
After picking the SSL certificate, click “OK” to save your work. You’ve now connected the SSL to your site. Your website can now use this SSL for secure links.
Great job! You’ve successfully attached the SSL to your site on IIS 10. Your site visitors can now enjoy a secure and safe browsing experience.
Remember, you might need to restart the IIS service to activate these changes. Also, if your server hosts multiple sites, repeat these steps for each that needs an SSL.
By attaching the SSL certificate to your site in IIS 10, you’re encrypting all site communications. This secures user data like login info and personal details. It’s essential for your site’s safety and reliability.
Benefits of Binding SSL Certificate to a Website in IIS 10
Enhanced security and data protection
Establishes trust with your website visitors
Provides a secure environment for online transactions
Boosts SEO ranking
Compliance with industry standards and regulations
Troubleshooting Missing Private Key or Certificate Request
If you find an error stating the private key or certificate request is missing, don’t worry. There are steps you can take to sort this out and get your SSL certificate installed:
Verify the private key: First, see if the private key that comes with the certificate is there. You can do this by going into the local certificate store on your Windows 10.
Regenerate the private key: If the private key isn’t there, you can make a new one. Just find the original certificate request file. Use this to create a new private key.
Reissue the SSL certificate: Can’t find the private key or the certificate request? You might need to talk to your Certificate Authority (CA). They’ll help you get a new SSL certificate issued.
Import the new private key and certificate: After getting the new private key and SSL certificate, put them into the local certificate store on Windows 10.
Bind the certificate to the website: Once you’ve put in the private key and SSL certificate, link the certificate to the website in IIS 10. This lets you have secure connections.
If you still have trouble after trying these steps, it’s best to get in touch with your Certificate Authority or check their guides for more help. Remember, always keep a backup of your private key and certificate to avoid issues later.
Error
Solution
Error message: “Private key not found”
First, check the local certificate store for the private key. If it’s not there, make a new one using the original request or get help from your CA.
Error message: “Certificate request not found”
If you can’t find the certificate request, contact your CA for a new SSL certificate. When you get the new one, put it in the local store and link it to your site.
Error message: “Unable to bind the certificate”
Make sure the private key and SSL certificate are properly in the local store. Also, check the setup in IIS 10 to be sure it’s right.
Additional Steps and Resources
Once you have the SSL certificate installed on your Windows 10, you might need to do a bit more. These steps help ensure it works right and boosts your website’s security.
1. Update Website URLs
Make sure to change your website’s URLs to start with https:// instead of http://. This move makes sure your website’s connections are safe and encrypted.
2. Set Up Automatic Certificate Renewal
Keep your SSL certificate secure by setting up automatic renewal. This way, your website’s protection doesn’t lapse. Certificate authorities have tools to help automate this process.
3. Configure HTTP to HTTPS Redirect
Set your site to automatically switch all HTTP requests to HTTPS. It keeps your visitors’ connections secure. It also stops any mix-ups that might make your site look unsafe.
4. Test SSL Certificate Installation
After everything is in place, test your SSL certificate. It’s vital to make sure you’ve installed it correctly. Check its validity and integrity with online SSL certificate checker tools.
5. Consult Additional Resources
If you need more help, look for resources from your certificate authority or hosting provider. They’ve got lots of detailed guides and support to help with any issues.
Securing your site with an SSL certificate protects your users’ data and builds their trust. Follow these steps and use available resources for a secure site. Your visitors will have a safe browsing experience.
Conclusion
Getting an SSL certificate on Windows 10 is crucial for safe website connections. Follow the steps and use the resources available to install and link the certificate. This will keep your users’ information safe, build trust, and make your site more secure.
It’s important to renew your SSL certificate regularly for the best security. Renewing ensures ongoing encryption and keeps security risks away. Always keep your SSL certificate current to avoid problems.
To install an SSL certificate on Windows 10, start by creating a Certificate Signing Request (CSR). Then, download and install the SSL certificate. Next, bind it to your website in IIS 10. If you run into any difficulties, look for solutions and take any extra steps needed. Following these instructions and keeping up with security practices will make your website safe and reliable for visitors.
FAQ
What is an SSL certificate?
An SSL certificate is a digital way to prove a website’s identity. It makes the data shared between the website and the user’s browser safe. This keeps important information protected.
Why is installing an SSL certificate important?
Having an SSL certificate on Windows 10 is very important. It keeps the conversation between your website and visitors safe. It guards details like login info and credit card numbers from hackers.
How can I install an SSL certificate on Windows 10?
To put an SSL certificate on Windows 10, you need to do a few steps. Start by creating a Certificate Signing Request (CSR) in IIS 10. Then, get and set up the SSL certificate. Lastly, link the SSL certificate to your website in IIS 10. Doing this makes sure your website is safely connected.
How do I generate a Certificate Signing Request (CSR) in IIS 10?
Creating a CSR in IIS 10 starts with opening the Internet Information Services (IIS) Manager. Choose your server and double-click “Server Certificates”. Then, click on “Create Certificate Request”. Fill in the necessary info and save the CSR file. You can use this file to ask for an SSL certificate from a trusted CA.
How do I download and install the SSL certificate on Windows 10?
To get and install an SSL certificate on Windows 10, start by getting the SSL certificate file. You can either get it from a CA or make a self-signed one. Next, open the IIS Manager and choose your server. Double-click “Server Certificates” and click “Complete Certificate Request”. Find the certificate file, name it, and click “OK”. Now, the SSL certificate is set up on your machine.
How do I bind the SSL certificate to a website in IIS 10?
To link the SSL certificate to a site in IIS 10, open the IIS Manager and pick your server. Look for “Sites”, choose the website you want, and click “Bindings” on the right. Click “Add”, choose “https” as the Type, pick the SSL certificate, and click “OK”. Your website will now have secure connections.
What should I do if I encounter an error message about a missing private key or certificate request?
If you get an error about a missing private key or certificate request, here’s what to do. First, find the original private key and certificate request files and make sure they’re in the right place. Then, try installing again. If the files are gone, you might have to make a new private key and certificate request.
Are there any additional steps or resources I should be aware of?
After installing the SSL certificate, you might still have things to do. For example, you may need to make your website redirect from HTTP to HTTPS. Also, change any direct links to use HTTPS. Test the SSL installation with online tools or browser extensions. Remember to renew your SSL certificate to keep your site secure. Check CA websites or online forums for more help and information.
Welcome to our easy guide on how to set up an Updox printer with Windows 10. By following these steps, you can quickly install and set up your printer. This…
When you’re installing Windows 10 from a USB drive, you might face some problems. These include physical issues with the USB, wrong formats, and EFI/UEFI setup troubles. Other common troubles…
Installing Visual Basic 6 on Windows 10 might seem tough, especially if you use old apps. Many are looking for ways to get VB6 running on their modern computers. They…
Do you get blue screen errors when installing Windows 10? Our guide offers reliable fixes for this issue. It covers the “pantalla azul al instalar windows 10” and stops errors…
Welcome to our guide on installing Bash on Windows 10. We’ll show you how to enable Developer Mode, install a Linux distro, and access the Bash shell. This allows you…
Microsoft has stopped supporting Windows 7. However, you might still need to use it. Creating a Windows 7 virtual machine on Windows 10 can solve this problem. This process lets…