Creating an unattended installation for Windows 11 makes things simpler. You don’t have to manually click through dialog boxes. This helps with faster, more customized installations. Follow this guide to learn how to set up an unattended Windows 11 installation.
An unattended Windows 11 installation speeds up the process. It automates tasks and can be tailored to your needs. You can use the same installation file on many computers. This makes it perfect for big rollouts. You won’t deal with passwords or account sign-in during setup.
First, check if your computer is suitable for unattended Windows 11 setup. You need at least 4 GB of RAM and 64 GB of free space. Also, have a USB with 8 GB free space formatted as FAT32 or NTFS. You’ll need a Windows 11 product key, possibly a general volume license. For software, get Ventoy, the Windows 11 ISO, and the Windows ADK for the answer file.
To start, make a bootable USB with Ventoy. Get Ventoy from GitHub and unpack it. In the folder, create a file named “ventoy.json” with given text. Then, download the Windows 11 ISO from its official site. Open Ventoy2Disk, pick your USB, and click Install. Finally, put the Windows 11 ISO onto the Ventoy USB.
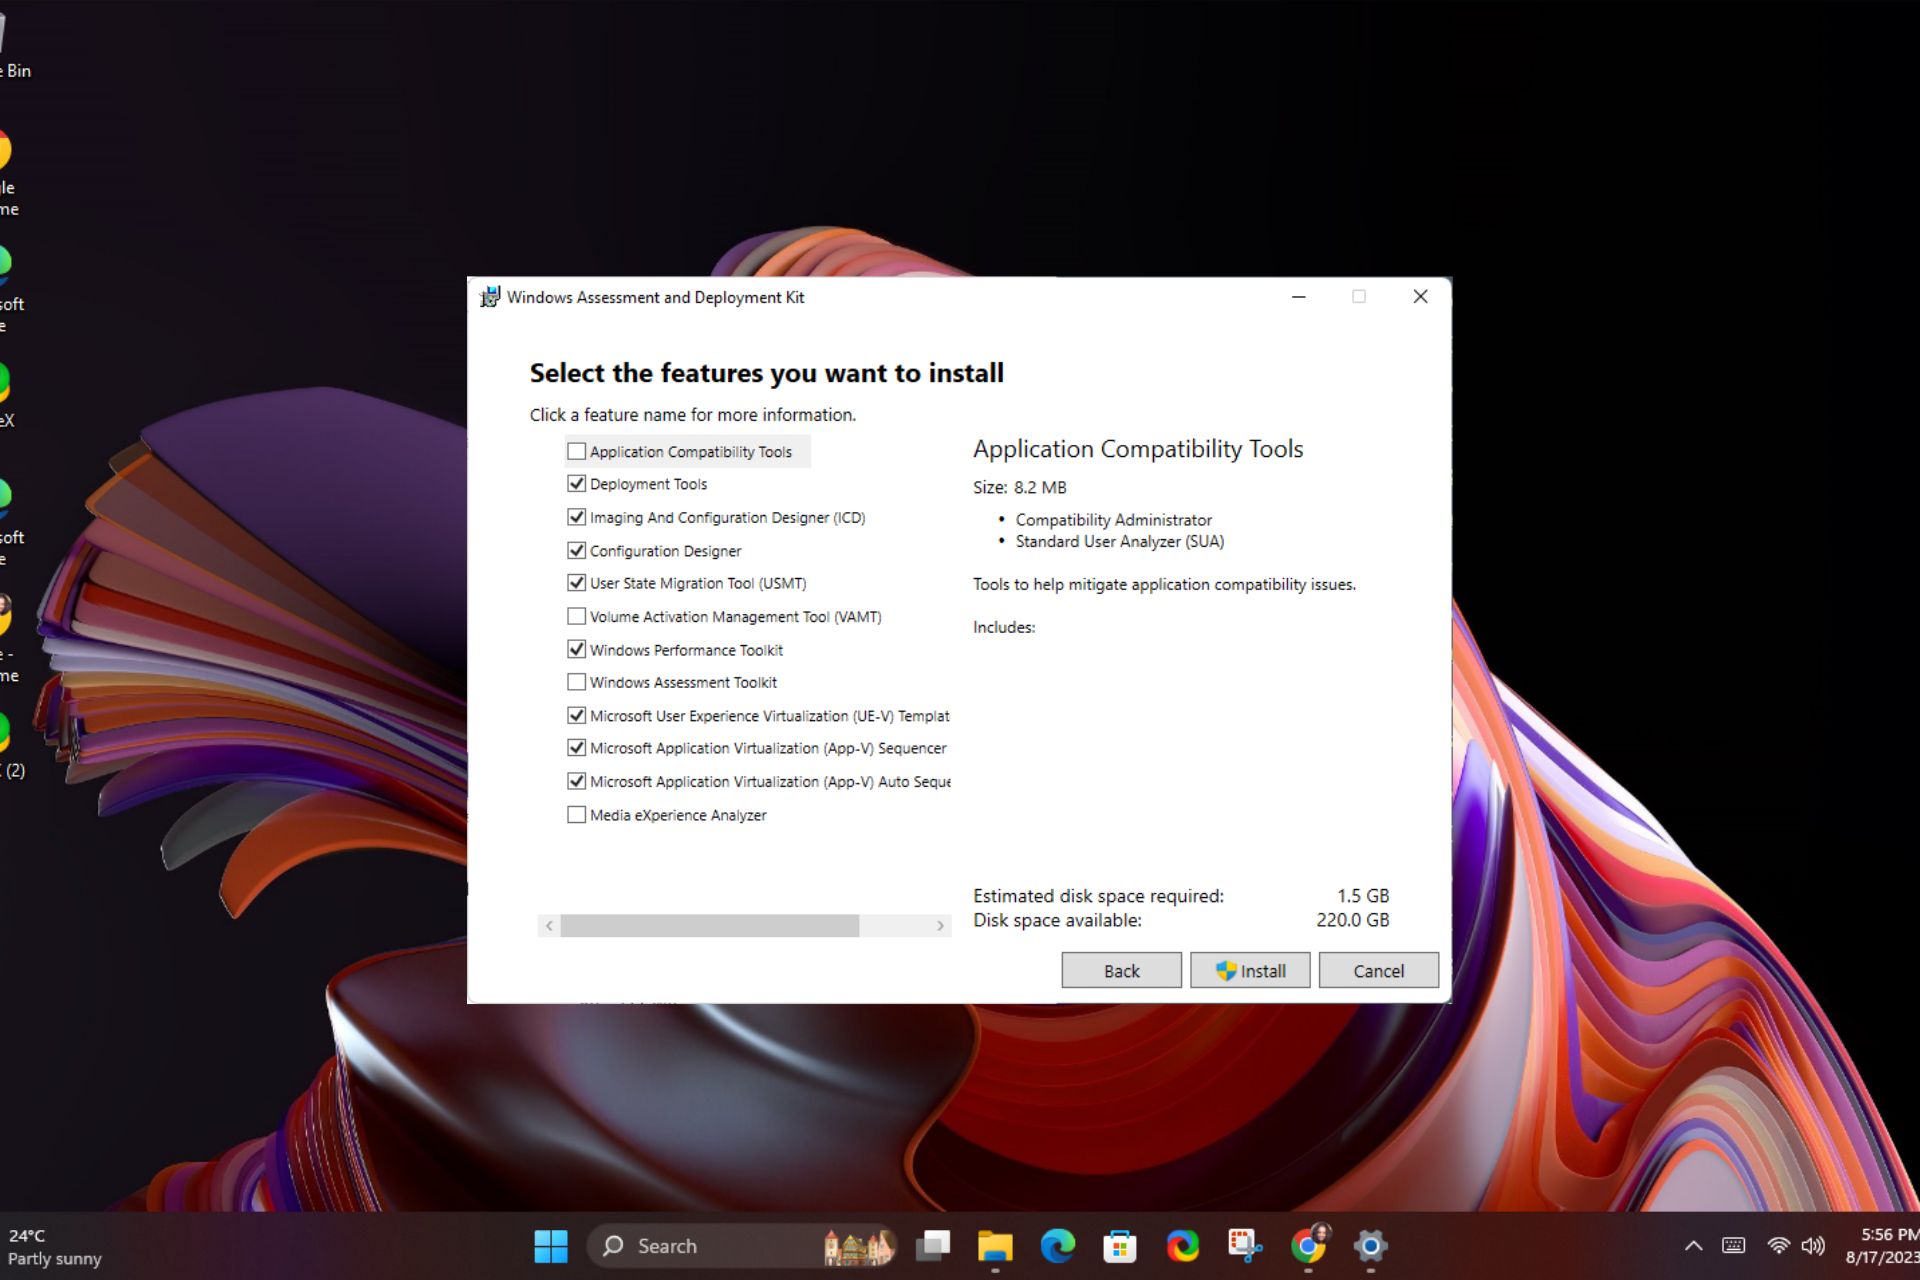
Next, use the Windows ADK tool to make the answer file. Install the ADK from its official site. Open the Windows System Image Manager and choose the Windows 11 ISO. Make a new answer file and adjust settings as needed. These changes include OEM details and auto boot to audit mode. Save the answer file as XML. Then, put it and any scripts on your USB. After, use DISM to mount the Windows image and add your files. Unmount the image and apply your changes.
1. Automation and Faster Installation: With unattended installation, tasks run automatically. This cuts out manual steps. As a result, the setup is much quicker than manual installations.
2. Customization: You can tailor unattended installations to fit your needs. Settings and configurations are pre-defined. This ensures your standards are met with every installation. It boosts efficiency and simplifies deployment.
3. Scalability: Using the same installer on many computers is a big plus of unattended installations. It allows for deploying Windows 11 to several devices at once. This avoids the hassle of individual setups.
4. Eliminates User Intervention: Unattended setups need no user input during install. This means no password prompts or sign-in requests. It offers a smoother installation process.
Unattended installation makes deploying Windows 11 faster. It also ensures consistency and customization. Plus, it avoids the usual issues of manual setups.
Benefits of Unattended Windows 11 Installation
Automation and Faster Installation
Customization
Scalability
Eliminates User Intervention
Requirements for an Unattended Windows 11 Installation
Before you start an unattended Windows 11 install, check your computer’s requirements. Your system needs to meet both hardware and software needs for success.
Hardware Requirements
Here are the must-haves for your computer’s hardware:
At least 4 GB of RAM
64 GB of free disk space
USB flash drive or external hard drive with at least 8 GB of free space
The USB drive or hard drive needs to be in FAT32 or NTFS format. This makes sure it works with the install process.
Software Requirements
You’ll also need specific software:
The Ventoy tool: It helps create a bootable USB for installing.
A Windows 11 Disk Image (ISO): This is the official install file.
The Windows ADK tool: Used to make the answer file for unattended install settings.
With the right hardware and software ready, you can start making your unattended Windows 11 install. Check you have all you need before you begin.
“Before proceeding with an unattended Windows 11 installation, it is important to ensure that your computer meets the necessary requirements.”
Creating a Bootable USB Drive for Unattended Windows 11 Installation
The first step is to create a bootable USB drive for Windows 11. You can use Ventoy, a handy tool that makes the whole process easier. It lets you set up a USB to install many ISO files.
Start by getting Ventoy from their GitHub page (https://github.com/ventoy/Ventoy). Then, unzip the files into a folder. Go into this folder and make a new file called “ventoy.json”. Open it and insert this text:
With Ventoy and the ISO file ready, open Ventoy2Disk.exe from Ventoy’s folder. Use it to pick your USB drive in the application. Be careful to select the right one, or you’ll lose data from the drive.
Click “Install” to start making your USB drive bootable. Ventoy will format the drive and add what’s needed. Soon, you’ll have your bootable USB for Windows 11 setup.
Then, put the downloaded Windows 11 ISO into your Ventoy USB drive. This helps the setup find and use the ISO file.
This image shows how to create a USB drive for Windows 11 setup. It shows using Ventoy and the Windows 11 ISO, key steps in the process.
Now, your USB drive is ready. You can move on to prepare the answer file for the Windows 11 setup. This file helps customize and streamline the installation to fit your needs.
Setting Up the Answer File for Unattended Windows 11 Installation
You’ve made a bootable USB for Windows 11 setup without needing input. The next task is to create the answer file. This is done with the Windows ADK tool. First, download and install the Windows ADK tool from its official site.
After installing the Windows ADK tool, open the Windows System Image Manager. Choose the Windows 11 ISO file you previously downloaded. Then, make a new answer file. Add the required settings to the different configuration stages.
These settings should include details like the company’s name and support info. They might also include auto boot to audit mode. Plus, any extra scripts or registry tweaks for the install. When done, save this answer file in XML format.
To finish setting up, transfer the answer file onto your USB drive. Use the Ventoy tool for this. Then, use DISM to mount the Windows image. Copy the answer file and any scripts or changes to the right places. Lastly, unmount the Windows image, saving the alterations.
Using the Windows ADK tool for the answer file is key for a hands-off Windows 11 installation. It lets you personalise the setup and automate parts, saving time and energy. With these guidelines, you’re on track for an easy and smooth Windows 11 setup.
FAQ
What is an unattended installation of Windows 11?
An unattended installation of Windows 11 is a way to install the OS without having to click on confirmation messages. This makes setting up the system faster and allows for custom setups.
What are the benefits of an unattended Windows 11 installation?
An unattended installation speeds up the setup process through automation. It enables a personalized installation. The same installer can be used across many PCs. This is great for setting up lots of computers at once. It also reduces manual input, like password entries and login details.
What are the hardware requirements for an unattended Windows 11 installation?
The system needs at least 4 GB of RAM and 64 GB of space on the hard drive.
What are the software requirements for an unattended Windows 11 installation?
You need the Ventoy tool for a bootable USB, a Windows 11 Disk Image, and the Windows ADK. These tools help create the answer file needed for setup.
How do I create a bootable USB drive for an unattended Windows 11 installation?
To make a bootable USB, start with the Ventoy tool. After downloading Ventoy, open it and prepare a USB stick with it. Then, get the Windows 11 ISO to put on the USB drive.
How do I set up the answer file for an unattended Windows 11 installation?
For the answer file, use the Windows ADK tool. After installing the ADK, open the System Image Manager. Choose the Windows 11 ISO and create a new answer file. Include settings like OEM info and boot options. Save this file in XML, then add it to your USB stick. Use DISM to apply this file and the scripts to the Windows image.
Welcome to our guide on setting up an M.2 SSD on Windows 11. If you want to improve your PC’s speed and storage space, you’re in the right place. We’ll…
When trying to install NVIDIA drivers on Windows 11, you might see a “NVIDIA Installer failed” error. This stops you from installing the needed drivers for your NVIDIA Graphics GPU….
Ubuntu is a free Linux system, while Windows 11 is Microsoft’s newest operation system. Setting up a dual boot lets you use both. This guide will show you how to…
Dual booting lets you enjoy Windows and Linux on one computer. This guide shows you how to install Windows 11 on Kali Linux. You’ll get a great dual boot setup….
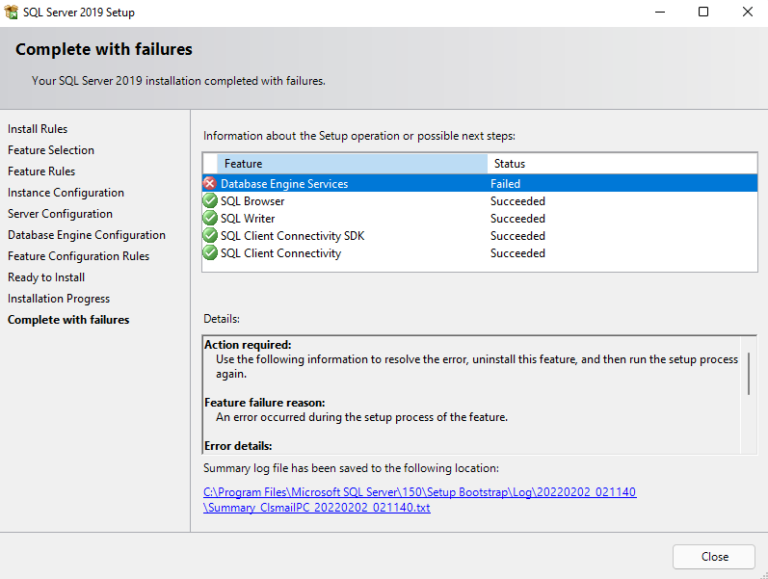
Trying to install SQL Server on Windows 11 can be tough. You might run into different problems. But, if you’re struggling with the setup, there’s no need to worry. We’re…